
COT2
|
| | | Steampunk Guns |  |
| | | Author | Message |
|---|
soothsayer
Journeyman

Posts : 1516
Join date : 2011-06-30
Age : 51
Location : Right here.
| | Subject: Steampunk Guns Mon Jan 12, 2015 9:12 am | |
| A couple years ago... on September 28 2012 to be exact, I posted this on Facebook, along with the subsequent image: - Quote :
- Proof of concept: Will be turning this "Larami SuperMaxx 1000" into a steampunk pistol. Good thing is it already has a canister and pipework; I don't see needing to make too many adjustments.
 Two years. No, scratch that, over two years and this project was still sitting in my office, my "art studio", a place I've organized and arranged (and sometimes rearranged, situation pending) so that I'd be more motivated to actually make things. That's really sad. So, this past weekend I made an effort to clear the clutter I've been collecting, to start working... and dare I say, start completing?... my have started / half planned projects. I had subscribed to a steampunk gun creation site, have seen some interesting items, and taking that as my inspiration, I set out to work on my own guns.  The above image shows the four guns I've been saving for my side projects, along with some common objects that are going to be incorporated into the designs. What follows are individual images, with descriptions as to what they are about, and what is in store. This first image is for a fusion cannon. Constructed primarily from a snowball maker / thrower, I'm going to be crafting it so the plastic champagne glasses are going to by energy containment cells, with the snowball storage (on top of gun) acting as the reactor; will be trimming the glasses to fit, and will also be running lights inside the gun to shine up into the glasses. The glasses will be water sealed, so I can do a little water / oil combo to represent aether. The funky arm rest coming off of the back of the grip will be removed, the bellows inserted in to the back of the gun to represent a cooling device, and the pasta container will be used as the barrels. 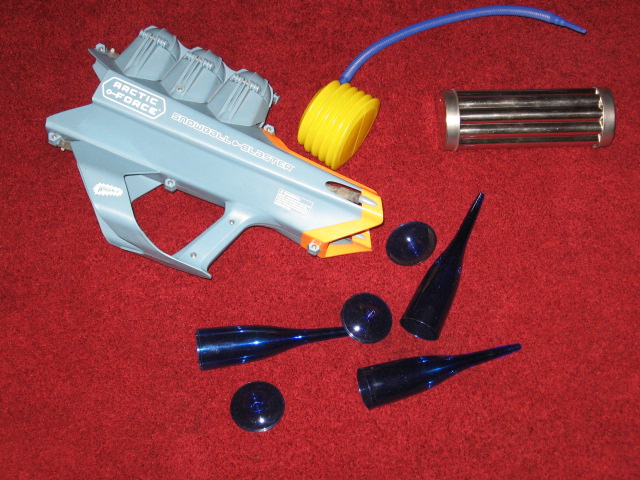 We've all seen this, and the various ways it is converted into a steampunk pistol. No need to go further here. 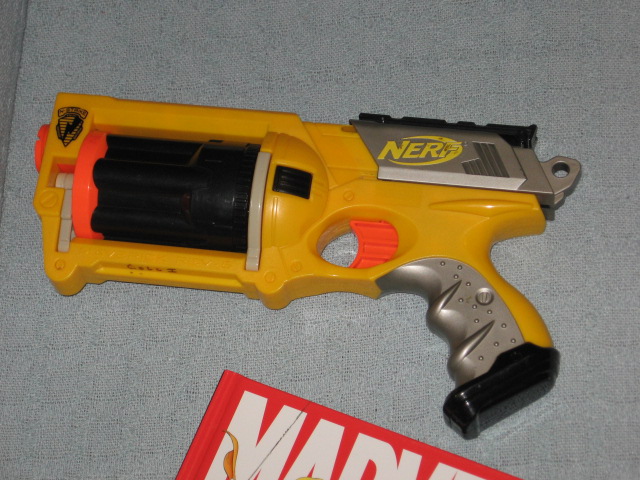 Here we have the remains, parts, pieces of the gun I had posted on Facebook. There were some creative changes as I was working on this Saturday, and some various bits of inspiration as I went from room to room to get tools or glue or pieces. Here, I'll show some images, and then explain things afterward.      As you can see, the gun itself is almost done.Barrel's been removed, replaced the barrel with a champagne glass, air nozzles and gauge has been added, as well as an energy source. There will be some panels plavced around the guage housing, so that it looks like a pipe coming off of the canister instead of a hat. I like steampunk guns and cosplay, but a lot of the times you don't actually see an energy source... just some gears and bits of copper wiring (on the guns, that is). I wanted to do something a little different with mine, to design a "feasible" gun, or at least one that I could explain. The aether units, located at the bottom of the weapon, will supply the heat needed to generate steam. There will be a hose connecting the two black nozzles, which would act as the means to which the heat is transferred; the top nozzle has a valve on it, which allows the operator to control just how much aether is allowed into the system, and can be adjusted by the flick of the thumb on the hand that is holding the forward grip (or quickly turned as normal). The aether, stored under pressure, is released into the compression chamber; when the right amount of pressure is achieved (as indicated on the pressure gauge mounted on top), the trigger is pulled, allowing the aether to escape, acting as a propellant along the way. Please note that the story of the technicalities will change as the project continues. The aether packs were created from old make-your-own popsicle tubes. Some blue and red food coloring, water, and vegetable oil, some marine sealant epoxy, and waa-laa, mini lava lamps. Because I'm using other popsicle tubes as the housing, the energy packs slide right in and fit snugly, without slipping out. I'll be reinforcing the caps though; run some JB Weld along the seal to act as double protection, and to run the weld over the surface of the cover to hold it in place. Perhaps make some JB Weld decorations on the gun as well, who knows. 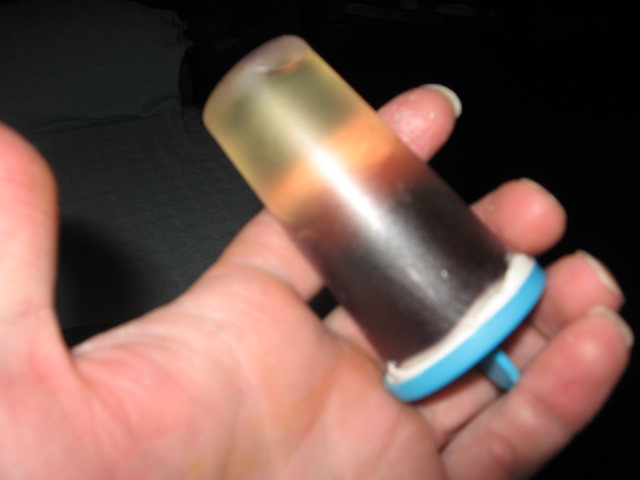 Hoping to sand the contour putty tonight, buff out the seams where the plastic halves join but one piece is higher than the other. You know, smooth everything out. Depending on how much ambition I have tonight, I may prime it today, or I'll just hold off until tomorrow. Hoping it'll look more like what it's supposed to when it's a uniform color! And then it'll be onto the fun yet painful process of painting. | |
| | | | soothsayer
Journeyman
Posts : 1516
Join date : 2011-06-30
Age : 51
Location : Right here.
| | Subject: Re: Steampunk Guns Mon Jan 12, 2015 3:37 pm | |
| Okay, hopefully I'll be doing the priming tonight as well *fingers crossed*, The sanding itself won't be too long... there aren't that many screw holes to go over, and as far as the seam sanding goes, a little bit of dremel magic, and it'll all disappear. The one thing that's going to be irksome is the housing I have to make for the guage; again, shouldn't take too long, but it's also a matter of needing the glue to dry. Suppose I could craft that when I get home, then start sanding while it's drying... will just have to see how it goes.
I also picked up some different kind of sealant. Notice the white blobs within the green energy pack? Yeah... that's the sealant, kind of dripped off the top of the cap. The cone still sealed, it just... it just looks like crap.
OOH! OOH! You know what I should do? Make a spiral out of my electric wire from the chainmail project, and insert it within the tube. That'd make for an interesting look, I'd wager. Plus, with it being weatherized or ionized or whatever, it really won't rust or corrode. Hmm, the possibilities.
The spray paint I picked up is Rust-oleum "Universal Advanced Formula"... good for any surface, any angle. The color I picked up is brown, thinking it'll be dark enough for shadows, and would make a nice enough base when I paint the copper, bronze, and wood colors. A nice feature about this is that this is a hammered paint, meaning it'll dry looking as if, well, as if it's been hammered, an excellent effect, I think, to give it an older kind of look. | |
| | | | soothsayer
Journeyman
Posts : 1516
Join date : 2011-06-30
Age : 51
Location : Right here.
| | Subject: Re: Steampunk Guns Mon Jan 12, 2015 10:13 pm | |
| Decided to sand what I could and then prime. I wasn't able to prime the gauge housing, but that wasn't a big deal; it wasn't affixed to the gun, and I can always prime that separately. Anywho, here's what I got so far.  Note: there will be a hose connecting the two air nozzles! And copper and bronze and wood paint! The top nozzle is made from two different parts. The dial section (forward) and stem are from a wine box valve, and the connector is from one of those cheap plastic bellows with hose,commonly found with rubber rafts. Same with the bottom connector. | |
| | | | soothsayer
Journeyman
Posts : 1516
Join date : 2011-06-30
Age : 51
Location : Right here.
| | Subject: Re: Steampunk Guns Tue Jan 13, 2015 3:39 pm | |
| - Quote :
- In the spring of 1846, Sir Francis Maxwell Dillon III developed a way to extract aether from the atmosphere by use of his resonating magnetic flux emitter. Utilizing a series of magnetic coils aligned to generate a field of subsequent strength, Sir Dillon was able to contain the aether for further study; one of the ideas which developed from this process was the ability to polarize the aether by means of magnetic emersion, thus creating a source of significant energy.
With the destruction of his laboratory later that year, Sir Dillon came to the realization that large scale implementation was a notion of folly. The amount of raw energy stored proved to be too volatile for his dreams of a world powered by his devices. With that realization, Sir Dillon set forth to reduce the size of his energy cells.
Over the next two years, Sir Dillon worked tirelessly on his project, and delved deeper into the field of microtronics. Turning to the government, and in turn the military, for research grants, Sir Dillon stumbled upon the answer for which he sought while observing a Tesla Coil at a science fair held by the Misakatonik University; the energy, he noted, is stored not within the device so much as it is within the concentrated rings, with each additional ring adding to the amount of energy stored, and that when the energy storage reaches its maximum, it is discharged into the air. Seeing a similarity between the coil and his own flux emitter, Sir Dillon in turn combined the two principles: the drawing of the aether into a magnetically contained field, it’s power being harnessed and directed by an electronic coil.
As 1850 rolled around, Sir Dillon presented a prototype weapon utilizing these principles. Though large scale, having to be transported via horse drawn cart, the military officials overseeing the test were quite pleased with the results. Promising a working handheld version in three months time, the government granted Sir Dillon an advance of $10,000, with another $10,000 upon delivery of a working system. Inspired, Sir Dillon not only produced as promised, but a full five weeks early, granting an additional $2,000 as a bonus; some officials believe Sir Dillon already had a working device and was simply biding his time, but as of today no proof of those allegations have surfaced.
Though the actual workings are a secret and marked classified, what can be ascertained through eyewitness accounts and previous experimentations, along with what is known of the process itself, the following can be deducted. Two cylinders, each containing a magnetic coil immersed within an alkaline and an unknown liquid, are inserted into an electronically charged resonating chamber; the aether, being attracted by this magnetic flux, is drawn through the cylinders, directed by the magnetic coils within. The resulting energy is transferred through a specially crafted alloy, where the energy output is regulated by a magnetic induction valve. The energy transferred is constrained, allowing for a pressure build-up within the containment tank. When the proper pressure amount is obtained, it is released with the pull of the trigger, causing the stored energy to expel forward along the gun’s barrel, propelling any object contained within the rotating cylinder. It is unknown at what speed the weapon discharges its energy, but it has been observed that a simple .50 ball is able to penetrate and reemerge through several inches of brick, as well as an inch of iron plating. It is believed that this is accomplished by means of energy transference, though the specifics are hypothesized at best.
Great care must be giving regarding the induction valve and the pressure within the containment tank; the valve controls the amount of energy allowed into the tank, and thus the speed in which it fills. Higher pressures, controlled by the amount of energy allowed in, could be used to propel heavier objects or even smaller objects at greater speed, just as lower pressures could, in theory, be used to incapacitate a target by discharging the energy without the added use of a propelled object. For rapid discharge situations, a nearly open valve would work best, as it allows for a full tank to be discharged almost instantaneously. However, should the tank fill too fast without a release, it shall discharge within the unit, akin to the energy displacement of a Tesla Coil, with the added threat of not only destroying the weapon, but killing the user as well.
| |
| | | | Sponsored content
| | Subject: Re: Steampunk Guns | |
| |
| | | | | | Steampunk Guns | |
|
| | Permissions in this forum: | You cannot reply to topics in this forum
| |
| |
| |
|