Posts : 1516 Join date : 2011-06-30 Age : 51 Location : Right here.
Subject: Re: On the Road Again Mon Aug 07, 2017 8:56 am
On a side note, my dad asked for an update on the conversion and so I showed him these pictures. He grinned, laughed in a good way, and said "it looks like a living room". That was exactly what I was going for... a sleeper / slash mobile office. If you look at it, I can easily remove the bottom bed/shelf unit and replace it with a small desk and a chair, or a table and a few chairs. I am now set for whatever, whether it be camping, an extended long distance haul / vacation, or if I work some wonky hours (or if I'm asked to go work at a site far away).
Slide the couch against the divide, remove the bottom bed and toss in a queen... spousal trip.
...
Hmm... may need to make curtains to go on the living room side of the screen. Add that to my "five minute projects" list.
soothsayer Journeyman
Posts : 1516 Join date : 2011-06-30 Age : 51 Location : Right here.
Subject: Re: On the Road Again Fri Aug 11, 2017 9:53 am
Propane and propane accessories
Getting geared up to install my stove... you know, one of the requirements of a motor home. My initial idea was to get a bathroom vanity cabinet from the Resale Shop, but in propane mounting brackets in the main compartment and have the drawers act as storage for utensils and plates and whatnot, with the stove going on top.
But then I learned there are some minor propane regulations when it comes to motor homes, campers, and the such. First and foremost is that the propane cannot be stored within the body of the vehicle. If you are using one of the small propane cylinders, roughly the size of a football, that's okay... the rules don't say anything about those. But a twenty pounder (the ones you get at gas stations), those have to be stored outside the body, and they have to be vented in case of gas expansion. Then there's stuff about having adequate ventilation, a carbon monoxide detector, and so on. As an extra notice, one should note that while it is legal to drive with the propane system on (running heater or fridge, as example), it is required that the system be turned off before entering a gas station or a tunnel. Who knew?
While my intention was to never actually have (or rather, use) propane, I still have to at least install the fittings to meet the requirements. So... here's the plan.
Within the black area of my sleep, I am putting up a cabinet and mounting the camp stove on top of it. I have the cabinet and the stove top already. I will be drilling a hole through the floor of my vehicle; since the floor is wood planking, this will be easy. On the internal side of the hole, I will put in a quick release valve, with a propane distribution post between the valve and stove; this will allow me to hook up other propane devices without having to connect/disconnect stuff (such as heaters or maybe refrigeration units). From the external side of the hole, I will run a hose to and through the utility box, which will then have the connections for the propane tank. The bottom of the utility box will have holes drilled to provide the necessary ventilation, with screening epoxied over the holes. Propane tank mounting inside the box will secure the tank, and the hose leading from box to hole will possibly be going through a PVC pipe just to provide extra protection.
I don't need all that precaution. I can just run the hose outside the vehicle and drop a tank 10' away, and I'd technically be legal. When done, roll up the hose and put both into a utility box. That's the quick "five minute project" way, but if I want to make this last, what I described above would be the preferred method.
I suppose a carbon monoxide detector would be a good idea... if anything, it'll be there for when I use the indoor propane heater. And, being a "necessity", it doubles the good idea-ness. As far as ventilation, pfft, I just open the back of the camper! Want a cross breeze? Open the door leading to the cab, with the windows open! Or, complete the five minute project in which I put those roof vents in. As you can see, I've got ventilation covered.
soothsayer Journeyman
Posts : 1516 Join date : 2011-06-30 Age : 51 Location : Right here.
Subject: Re: On the Road Again Mon Aug 21, 2017 9:47 am
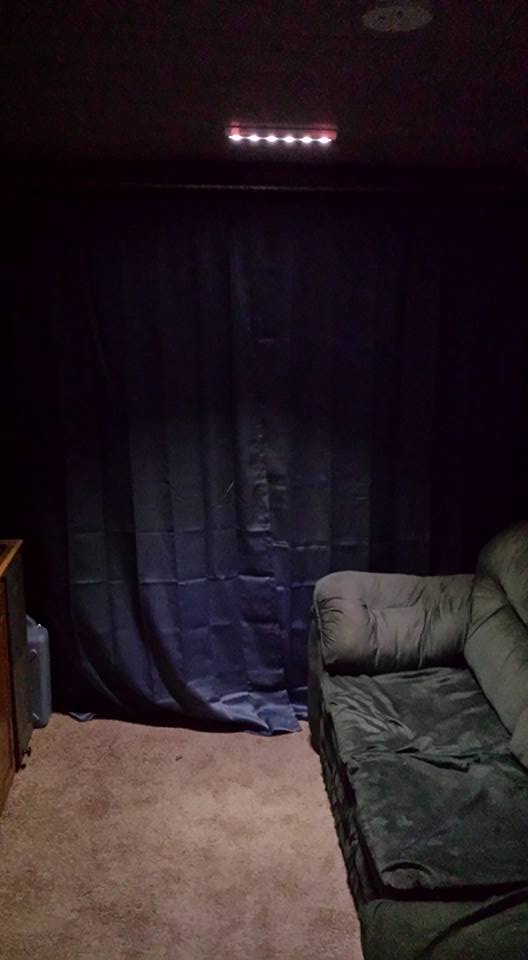
Four of my "five minute projects" were completed this weekend. I could have done more, but Saturday I almost had a breaking point and just had to get away from the house for a day of distraction. My magnetic screen is up (as are the curtains), ceiling rim is taken care of, lighting, smoke and carbon monoxide detectors, and my kitchen assembly.
I will have to trim the screen a little bit; it's dragging on the floor, so the bottom portion doesn't really clasp shut that well. I'm also going to have to create a couple magnetic clasp areas for portions of the screen that don't close properly (the very top and very bottom). Otherwise it is good to go. I'm also either going to have to hem the curtains or find some way to lift them up; they're 84" curtains, but the space they're in is only 78" high. It's not bad, and I'm sure that the few inches on the carpet will aid in keeping drafts down if I ever go winter camping, so that bit is neither here nor there.
The ceiling trim was accomplished by the use of duct tape. I used an olive brown colored tape to go down the middle, then a beige colored tape on either side of it, to give it more support strength. While it doesn't match the coloring of the panels, it does the trick in lifting up those portions that were saggy due to not being on a support strut. And in truth, while it is noticeable, casually walking through the truck you won't notice anything out of the ordinary.
The lighting units are those LED closet lights. Not the kind where you press the bulb to activate; I had gotten those, but I wasn't happy with them. No, there are small LED strips; the two on the ceiling have five? six? soft white lights, and the two on the horizontal have four bright lights. Both types have a remote control to activate them, and while the control for the two horizontal I will be attaching someplace to the truck, the control for the two ceiling lights will be loose / just sitting wherever. The reasoning for this is twofold: the one for the horizontal lights looks like a normal wall mount switch, whereas the ceiling lights is just a button... stick it in your pocket, go into the woods to pee, turn on the lights to see where the truck is at. *shrugs*
Smoke and carbon monoxide detectors probably wouldn't have been needed, but if there's the possibility of having propane active in the truck, it certainly wouldn't hurt.
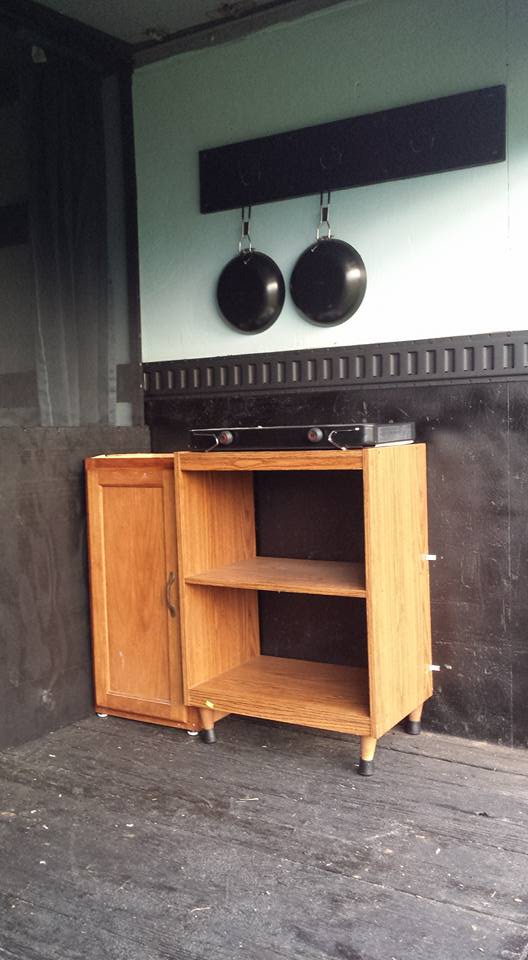
Kitchen assembly consists of a small shelf unit, a cabinet, and a two burner camp stove. The cabinet acts as a normal cabinet, storing dinnerware and utensils and whatever, while the shelf will hold canned goods; will be rigging up some sort of strap or bar to go across the openings of the shelf so that nothing slides out. The camp stove is mounted onto place, and fits perfectly on the shelf. I'll be mounting a fire extinguisher on the wall next to everything. There's also plenty of room between the shelf and the door if I wanted to put a cooler there.
Going to be hitting Menards this noon hour to grab some glow-in-the-dark spray paint. Planning on spraying the sides / top of the ramp. Not the part you walk on, just those side support rails. Way I figure, if we're camping, the ramp will be pulled out. They'll "charge" during the day, and will be visible at night so we know where to step or walk.
With the magnetic screen being up, I consider this vehicle good to go for camping trips. Too bad this coming weekend is the fair, and the following weekend is the bridge walk. Maybe I'll sleep in it on Friday?
...
In the series of pictures below, the first is of all the lights turned on (you can see what I mean about the bottom of the magnetic screen), the second is from inside with just the ceiling lights on (bright enough, kinda warm / comforting), and the third is the kitchen assembly.
soothsayer Journeyman
Posts : 1516 Join date : 2011-06-30 Age : 51 Location : Right here.
Subject: Re: On the Road Again Tue Sep 05, 2017 9:37 am
Weekend Update, September 4
Just a few minor things.
1. Primed the top and sides of the ramp rails (not the walking area), then coated them with the glow-in-the-dark paint; turned out very nice. While it doesn't glow like most items, it glows enough to be seen. No one will be able to walk through and trip over the ramp, saying they didn't see it. I think the main reason it doesn't glow brightly is because it's already spending the "charge" as the sun sets. But, between what it does glow, and the white primer underneath, it is still bright enough to be seen. Safety first!
2. First aid kit and fire extinguisher have been installed.
3. Mosquito screen has been trimmed a bit more; magnets pull it shut much quicker now. I think I'll still have to add weights to the bottom of the screen, only because I noticed a good breeze does pull them apart.
4. Bug deflector is up. Window deflectors will be going up soon.
5. Last ceiling panel is up (within the overhanging area.
6. Radio is this close to being swapped out.
UPCOMING
1. Attach the stove to the shelf unit. It's recommended that the stove does not sit atop anything combustible, so I'm going to use the stove legs to keep it off the shelf, and just attach it by the legs with some U shaped clamps.
2. Swap headlights. Driving at night with this is a pain; I'm thinking the headlamps are original... old. The light is yellowish.
3. Hem some curtains for the overhanging area.
4. Maybe get a retracting screen for the door leading into the cab. I figure, if it's hot, if I have the cab windows open, it'll create a cross-breeze. Don't need mosquitoes coming in from that direction.
5. Look into a stable wall mount for a TV.
6. Still need to put in the RV outlet and the cable junction.
EXTRAS
1. Craft a PVC roof, curved, and cover it with a tarp. Need this before winter time, so that the weight of snow doesn't press down on the roof and so ice doesn't build up or seep inside.
2. Need gravel! I have some treated 4x4s and some bed lining to make a parking spot, just need gravel. Don't want the truck just sitting on grass.
..
Side note: Steve poked his head in the other day, rather likes things. He says it looks more like a cabin then it does a truck.
soothsayer Journeyman
Posts : 1516 Join date : 2011-06-30 Age : 51 Location : Right here.
Subject: Re: On the Road Again Fri Sep 08, 2017 1:10 pm
Duh or: why didn't I think of that earlier
Was at Goodwill during the noon hour, looking for... nothing, really, just a time waster. Was walking past the area in the back corner where they have the backpacks, suitcase, and blankets when I had an epiphany. I've been trying to find short curtains to place over the overhanging area, haven't been able to find what I was looking for, and came very close to making my own: why not just use bed sheets?
Ran to Walmart, bought two twin size three-packs; contains a flat sheet, a fitted sheet, and a pillow case. I'll be using the two flat sheets (folded in half) to act as curtains for the overhang. And this way, I have {fitted} sheets to go over the mattresses. Win / win!
soothsayer Journeyman
Posts : 1516 Join date : 2011-06-30 Age : 51 Location : Right here.
Subject: Re: On the Road Again Tue Sep 12, 2017 11:04 am
Weird
Since installing the radio, my battery has been draining. I cannot figure out why; all the colored wires match. Reading up on this at work, seems it is a common occurrence. I'm going to have to check the negative terminal, make sure I tightened it back on all the way. Apparently, the quick fix is to simply pull the fuse (for preset station memory), but I don't want to look for a quick fix.
I'll have to check the brand of radio, too, see if something is screwed up with them. The previous radio was just fine, could go for weeks without worry.
Rather pisses me off.
...
Now, there was a blue wire that had a black shrink seal on the end. I did find a match for it, so I took the seal off and connected the two. Perhaps that is the culprit? That'll be a final test I suppose; undo that connection, see what happens.
{edit}
Last night I checked the battery connections (nice and tight) and then I went through the wiring chart for the radio; the solid blue wire was for "power antenna / power amp". I'm no expert, but since the van doesn't have a power antenna or an amp, I don't see how there could have been a drain... but I went ahead and disconnected that just to be safe.
I'll check the van tonight when I get home, see how quickly it fires up. Drove around the Crivitz area for about a half hour yesterday so the battery would get a good charge. Hopefully that blue wire does the trick.
I did notice that, when the radio's faceplate is removed, there is a small red blinking light, probably one of those false security alarms thingies. I'm hoping that that isn't the cause of the drain. Regardless, after seeing what goes on tonight, I may just pull the radio's fuse (after charging the battery again) and see if it is in fact the radio, and not something else. I can't imagine what, as the only change I've done electronically was the radio.
{editing the edit}
Checked a few things online yesterday afternoon, and yes, it seems an inoperable power antenna will drain the battery, but over a length of time. The forum accounts I read showed that a bent antenna that can only retract halfway draws some juice from the battery. I couldn't tell you how much, but I reasoned that, with that wire essentially being "live" and attempting to lower a device that was nonexistent, it might just try to draw that electricity a bit longer. I don't know, I still can't see how something that doesn't exist is able to drain power, but *ehh*, whatever.
When I got home last night, I went to the conversion; it started up like it did on day one, and the battery gauge didn't show any drop from the day prior. Yay me! I'm still a little suspect though, not believing it was the power antenna, so I will wait a second day before firing it up again; the first was a 24 hour period, and when that wire was connected, there was noticeable decline in the battery and starting time. With the wire disconnected, the 24 hour wait started without an issue... so, just to double check things, I'll wait 48 hours (Friday afternoon), thinking that if there is a drain, that long of a period should be enough to have some effect.
soothsayer Journeyman
Posts : 1516 Join date : 2011-06-30 Age : 51 Location : Right here.
Subject: Re: On the Road Again Fri Oct 27, 2017 10:45 am
sleeping on the job
Last weekend, I spent my first night in the conversion. I didn't go anywhere, just kept it parked in the back yard. I wanted to test or experience a couple things: it was supposed to thunderstorm that night, so I wanted to hear just how loud it was inside (it rained, but it didn't storm), and I also wanted to check the feasibility of using it as a living quarters.
1. Using my laptop as a television, I can say that a 15 inch screen works well and can be seen clearly from the couch, though I doubt subtitles or on-screen instructions would be legible. This works as I have that 19 inch television sitting in the basement.
2. With the bed laid out, there's only a foot or so of space between the couch and the bed. Not the best, but it's workable. Anyone coming out from the overhang is definitely needing to be mindful so as not to step on the person sleeping below.
3. There is still a fair amount of noise coming in, though probably not as intense as, say, a tent. It's like being in a house.
The weather that evening was rain, with a nighttime low of 62*. Using a thin-to-standard blanket, I was fine.
...
This coming weekend, I plan on sleeping in it again; in particular, Saturday night. Nighttime low is supposed to be 27*, and I'll be testing how well it maintains heat.
I have a gas heater for the conversion, but I won't be using it. Instead, I'll be using a small space heater, one that's geared for small rooms. I'll be running an extension cord from the garage and in through the van's window (I have window visors in place, so nothing will drip inside), then run the cord through the cab access door. I may attempt to cover the door or window opening, we'll just have to see.
With the curtains to the overhang closed, the back door closed, the main curtains closed, and with the ceiling being insulated, I'm thinking things will be pretty good. With the curtains, I've essentially created a living area of 120 square feet. I was originally going to create foam inserts to go over the screened wall for winter camping (which I might still do), but for now I'm hoping that the main curtains will act as a "good enough" barrier. Could always go with the heavier thermal curtains, but that's something to be considered at a later date.
My main concern with this would be heat loss (or cold absorption) through the walls; the only thing there is aluminum sheeting and half inch thick plywood. If I can feel the cold radiating from the walls, I'll know that I may have to look into insulating them as well. That was another "original intention" I had, taking down the plywood, putting in insulation, putting plywood back up... but I decided against it as a time and cost saving measure (believing the plywood would make a good barrier). I am really going to hate having to dismantle everything if this doesn't work.
I don't really seeing myself conducting further tests after this one. Sure, there will be colder temperatures coming, but a lot of that is due to wind chills. If a small space heater works under these conditions, then a normal heater will work just as well.
soothsayer Journeyman
Posts : 1516 Join date : 2011-06-30 Age : 51 Location : Right here.
Subject: Re: On the Road Again Mon Oct 30, 2017 8:26 am
winter camping test
So I did spend the night in the conversion this past Saturday, and for the most part it wasn't too bad. I put a small single room space heater (Pelonis HF-0020T) in the back of the van at roughly 6p, having run the cord through the cab access door and then through a window. The outside temperature at that time was 40*, with an interior temperature of 45*.
I headed out to the van at about 9:30p to make the bed and get my laptop ready. By time everything was up and running, the outside temp was 33*, inside was 56*. I didn't crawl into bed until about twenty minutes past midnight; outside temp didn't change much (32*), and the inside dropped down to 54*.
I did wake up a few times during the night, but that was mainly due to sounds like the train and the nearby bar. I woke due to the cold a couple times as well; I checked the temperature every time I woke up because of the cold, and the lowest I recall seeing was an indoor temp of 45*. That was during the 5 o'clock hour, and if I remember right, I believe the outside temp at that time was supposed to be 26*.
All told, it seems as if the van maintained a 20* warmer temperature than the outside. Not too bad! I'm fairly certain that a bigger or better space heater would have done a much better job, so I have no doubt that my indoor propane heater (it's called Mister Heater Buddy) will work. People use this type of heater in tents, RVs and as an emergency heat source, so I'm not worried at all. From reading reviews, this type of heater does go through propane quickly if it is set on high (3 hours for a small canister), but if you don't mind wearing clothes, you can put it on low (6 hours for a small canister) and be fine. I intend to use a 20 pound propane tank, the size you see at gas stations, and that's supposed to last 5-6 days.
From what I experienced, there are a few things I can do to improve the heat retention of the van. First, I need to get some pipe insulation tubes of some foam noodles to line the inside corners as you can feel the cold radiating from between the plywood and the aluminum shell. I hadn't thought of that before, but considering that the corners are just the single layer of aluminum, it'll help a lot. The second thing to consider is the use of heavy thermal curtains. Right now I just have up some basic room darkening curtains, and while they did help in acting as a heat trap, they could have been better. I probably could try insulating the sides as well, but that would be quite involving; not only would I have to remove everything I put in (which in itself is no big deal), I'd also have to take down the e-track... not to mention having to align all the holes exactly when putting the stuff back up. No, I figure between the shell and the plywood, it'll be fine. As it was, while the walls were cold to the touch, they weren't freezing... and hell, if people can survive in a nylon or canvas tent while winter camping, plywood will be perfectly fine.
Points to consider: next time I will probably need a thicker blanket, and I'll need to go to bed with socks on. As it was, I used a normal thin blanket, folded in half; it worked, but it could have been better. I also went to bed wearing a thin sweatshirt (not a real sweatshirt, but one of those fake thinner ones) and sweatpants. No socks. I probably would have been more comfortable wearing socks. But hey, that was the point of this test, to see what improvements need to be done.
On a side note, I may need to think about installing a funnel system to act as a urinal. For winter camping, not for everyday use. Unless I want to crawl through the access door and go outside that way. Let's just say that when you're sitting on the couch watching a movie and you have to go pee, going from 56* to stepping onto the bumper and aiming outside in 30*, it makes for a big difference, not to mention the fact that there is a big heat dump when you open the back door.
soothsayer Journeyman
Posts : 1516 Join date : 2011-06-30 Age : 51 Location : Right here.
Subject: Re: On the Road Again Mon Apr 23, 2018 9:21 am
Hello, Spring!
Now that spring has arrived to northeast Wisconsin... at least I hope so (that dumping of snow we had last weekend *shrugs*)... it's time once again to work on the Dog House! This year I hope to put in the power connect, roof vents, and run a gas line. Oh! And get a load of gravel to make a parking stall! This gas line does not need to be connected to anything, just need to have it just in case.
Since my last post, I have purchased several foam noodles to insulate the corners and edges of the plywood walls, should have those in this week. I have also recently bought quite a few camper windows at a great price; landed up driving to West Bend to get them, but the price couldn't be beat (eight windows for $75). While grabbing the windows, the seller made an offer an a camper water storage tank: $25 for a 53 gallon tank. Having priced these last year, I immediately jumped on it.
...
This past week, I've been whittling away at the snow bank behind my park yard so I can get the van out. I was able to drive it out Saturday. Very happy! Popped the battery in, and surprisingly didn't have to charge it all all, it just fired right up. Took a little bit of coaxing to get her to move; the front left tire had sunken into mud, but I was able to pull up, turn the wheel, and ease her into reverse. Drove the van for about twenty minutes just to get things flowing again.
Sunday, with ice chipper in hand, I took out a ledge of ice that was all that remained of the snowbank. Monday (today), I brought the van to work and didn't experience any issues.
soothsayer Journeyman
Posts : 1516 Join date : 2011-06-30 Age : 51 Location : Right here.
Subject: Re: On the Road Again Thu Apr 26, 2018 11:53 am
CAMPING SITES link heavy
Been looking more into free camping. Besides Walmart Camping that I mentioned last year, I recently learned that you can also camp at Cabela's , though there might be a cost involved if you want to use hook-ups, but that cost is negated if you purchase something in-store.
Then there's the BLM, or the Bureau of Land Management. Did you know you can camp on BLM land for free? Me neither!
A few sites that might prove useful for those who want to go forth...
Free Camp Sites - Handy little tool that will help you find campsites based on free / pay / permit / or may need additional research; filters also can be adjusted for activities and amenities.
All Stays - I haven't played with this site yet, so I can't say how it works. But it has an app, which is nice. Would certainly make things easier in finding places when you're already on the go. *EDIT* This is a monthly subscription app, but apparently the reviews, both positive and negative, are spot on and accurate.
Harvest Hosts - For those who may buy a "self contained" camper or RV (meaning you have interior toilet and water holding tanks, as well as interior kitchen), this site requires fee-paying membership, but allows you access to a database of farms, wineries, etc that will allow you to come to their place.
Boondockers Welcome - Another subscription site, but cheap at $40 a year. However, there's an option to become a sponsored member, to which the annual cost drops to $20 a year. Unlike the campsite site, this site is based off of private property owners who are willing to allow RVs to stay at their place for free; some places include water and electric hookups.
...
For a little extra, here's a helpful page from Free Campsites entitled: Hot to Find More Sites
soothsayer Journeyman
Posts : 1516 Join date : 2011-06-30 Age : 51 Location : Right here.
Subject: Re: On the Road Again Mon May 07, 2018 1:59 pm
minor work done
June 8 2017 post wrote:
1. Does it have an internal water supply or a working sink? Does it have external hookups for water? 2. Does it have a refrigerator or ice box? 3. Does it have a toilet? 4. Does it have a power supply? 5. Does it have a kitchen or stove? 6. Does it have a heater or an air conditioner?
A lot of the above I answered positively, due to some creative reasoning. But now, I can take one of those generalized answers and make it an official 'yes'. # 4, does it have a power supply (or does the vehicle have hookups for an external power source)?
All I did was basically make a small extension cord going through the bulkhead. This box is a weatherproof RV outlet (right next to the driver side door), with two feet of actual home wiring connecting it to an outlet inside the van body. Simple enough. Now I don't have to run extension cords through an open window, into the body through the access door!
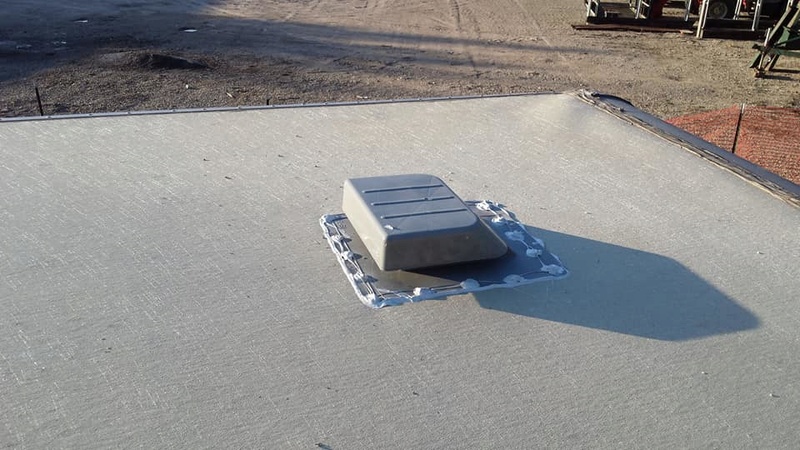
The other thing I did this weekend was install a roof vent (originally purchased April 12 2016). I would have put up the second one, but one is good for now. The original vent had eight holes (one in each corner, one in the middle of each length); I added eight more. I used a drywall saw blade hooked up to a power drill to cut a 7" circular hole from the inside up, marked and drilled 1/2" holes from the top down to attach 2" long bolts with washers. Caulked everything with a rubbery acrylic caulk before permanently attaching things.
In order for me to get about the roof, I laid out a few boards (aluminum van frame supporting boards) and crawled on those; I doubt the fiberglass roof would have supported me. I figure, I can easily have the second vent up on any given day, would just rather on a nice cloudy or overcast one.
soothsayer Journeyman
Posts : 1516 Join date : 2011-06-30 Age : 51 Location : Right here.
Subject: Re: On the Road Again Mon May 07, 2018 4:15 pm
work test
This coming Tuesday and Thursday nights, I will be sleeping in the Doghouse... at work. We had a termination here, but a 3rd shifter, so the client requested extra coverage from 8p until 5a. Since I'm not one to refuse overtime (especially when it involves sitting in a parking lot doing nothing), I jumped at the chance. The fact that it gives me an excuse to bring the van did not factor in at all.
In checking out the weather forecast for this week, I realize that this might also give me a chance to test a product or two.
Tuesday night - Not too bad, with an evening low of near 50*. I've already proven I can sleep in the van when it is 25* outside; with a small space heater, internal temp was 45* at the lowest. The worst part of that experience was the cold radiating in from between the bulkhead and the plywood. As I've got foam noodles to stuff into the corners, this evening might be a good time for me to put those in. Plus, with daytime temperature (Tuesday) being 80*, the interior will have a nice heat up before the cool down.
Thursday night, however - Going from a daytime high of 60* into an evening low of near 40*. Van interior won't be too warm. Evening temp is still manageable, but I may have to set things up for a warmer experience: that's where my indoor propane heater comes in! Good for 200 square feet, the heater has a low and high setting, which makes one pound tanks last three to six hours (20 pound tanks can be used as well, extending time from 48 to 110 hours). I probably wouldn't even need a heater; between sweatpants and sweatshirt and if I use a sleeping bag as well (rated at 35*), I'll remain toasty enough.
All this just means I now know what I'll be doing tonight when I get home: clean the back out of lumber I bought for some side projects, vacuum, fix the curtains, put in noodles, charge battery packs, pack cloths and blankets. Woo-hoo!
soothsayer Journeyman
Posts : 1516 Join date : 2011-06-30 Age : 51 Location : Right here.
Subject: Re: On the Road Again Wed May 09, 2018 8:01 am
work test, day one
Wednesday May 9th, morning {0000 to 0645}
Got to my overnight location and changed into sleepwear by 12:15a. Not knowing what to expect temperature-wise, I donned sweatpants, sweatshirt and socks, and crawled under a nylon quilted blanket (think sleeping bag without the zipper). Interior temperature at that time was 57*. Landed up having to take off the sweatshirt during the night, was getting too hot, but other than that, not too bad.
Did wake up a few times during the night, but that was due to unfamiliar noises, and not from sleep conditions.
Morning interior temperature was 52*.
...
Putting in the foam noodles along the corner areas helped a lot. I didn't feel a single draft. Now granted, there wasn't much of a difference between interior and exterior temperatures; that could explain the lack of draft, but it was a breezy night, so I'm thinking the wind would have had some sort of cooling effect on the van body. *shrugs* We'll find out Thursday night.
So is there anything I can take from this experience? Yes... clothing hooks! I did put up a couple boards with hooks, but at some point those will be taken down (when I put in windows). From the RV living videos I've been referencing, it would seem those mount anywhere Command Strips are an essential. I'll probably just mount the hooks I have on hand. I also really need to get a waste basket or a hamper; both, actually.
soothsayer Journeyman
Posts : 1516 Join date : 2011-06-30 Age : 51 Location : Right here.
Subject: Re: On the Road Again Fri May 11, 2018 7:48 am
Work test, day two
Thursday May 10th, morning {0000 to 0645}
The subject of this test was to check out the feasibility of the "Mr Heater Buddy" indoor / outdoor propane heater, which I acquired from Walmart for about $50 to $60. A lot of winter camping fanatics swear by this, but using a propane heater in something like nylon mesh (ie, plenty of ventilation) is a little different than a small enclosed space.
I used two 1lb Coleman propane tanks: one was for the HIGH setting while performing my extra coverage duties, to see if the carbon monoxide detector would go off; the second was used throughout the night on LOW, to maintain a heated environment.
I ran the one on HIGH from 8:30p to about 11:40p. The exact time the tank ran dry I couldn't tell you. On HIGH, the heater says a 1lb tank would last about three hours, and it did just that. Carbon monoxide detector never went off (fresh battery, tested, works). Internal temperature approached 60*, so not too bad; I don't know what the evening temperature was right now, but I'll edit this later for comparison.
With the one on LOW, it ran from about 12:25a to 4:45a... a little shorter than the advertised six hours. Internal temperature, at least at the times I woke up and checked, stayed between 50* and 55*. I went to bed wearing sweatpants, sweatshirt and socks, but landed up taking the socks off (they were closest to heater, so the warmest) and the sweatshirt off as well, and didn't experience any discomfort.
Between the time the tank ran dry and to when my alarm clock went off, the internal temperature dropped to about 40*.
But what of outdoor temperatures? How do they compare?
According to the weather archive, it went from about 38* at 1a to 34* at 4a, before warming back up to 37* by 7a. All told, this looks like the Mr Buddy rose the internal temperature by an average of 15*. That isn't too shabby, especially considering the fact that the sides aren't insulated, the rear door isn't weatherized, and I had the top vent open.
Because of these results, I am definitely going to be picking up a second heater. Not for the van, but for the house, in the event the power goes out in the winter time. Buy a 20lb tank and the proper length hose, we'll be good!
soothsayer Journeyman
Posts : 1516 Join date : 2011-06-30 Age : 51 Location : Right here.
Subject: Re: On the Road Again Wed May 30, 2018 8:43 am
Update
1. Last week the boy and I put in the second roof vent. While I haven't noticed any interior temperature change, I'm sure it is helping; I'll have to take a reading this afternoon to see how it differs from the external temperature, though now that I think about it, as soon as I open the back door, any interior temp is going to register differently. *shrugs* I'm sure it helps though, or else why would campers, RVs and houses have them, right?
2. With regards to the wall panels I put up for the ceiling, some of the hex head screws have popped through. I had originally hoped that they would have held the panels in place, as their heads are roughly 3/8" wide, but I didn't factor in such things van movement, so now I am forced to go with option two... something I thought of in the beginning, but didn't go with so I could keep costs down: fender washers. I'll be removing the screws one at a time, then setting them back in place with a fender washer; this will create a wider coverage area, allowing for better support. I'm going with a 1-1/4" fender washer, which will give me three times the coverage.
I need to take care of number two (heh) this afternoon because I don't want to drive the van if the vibrations are causing the panels to pop, and I really have to drive the van tomorrow so I can get some lumber in order to build and place the mrs a clothesline before this weekend. Why?
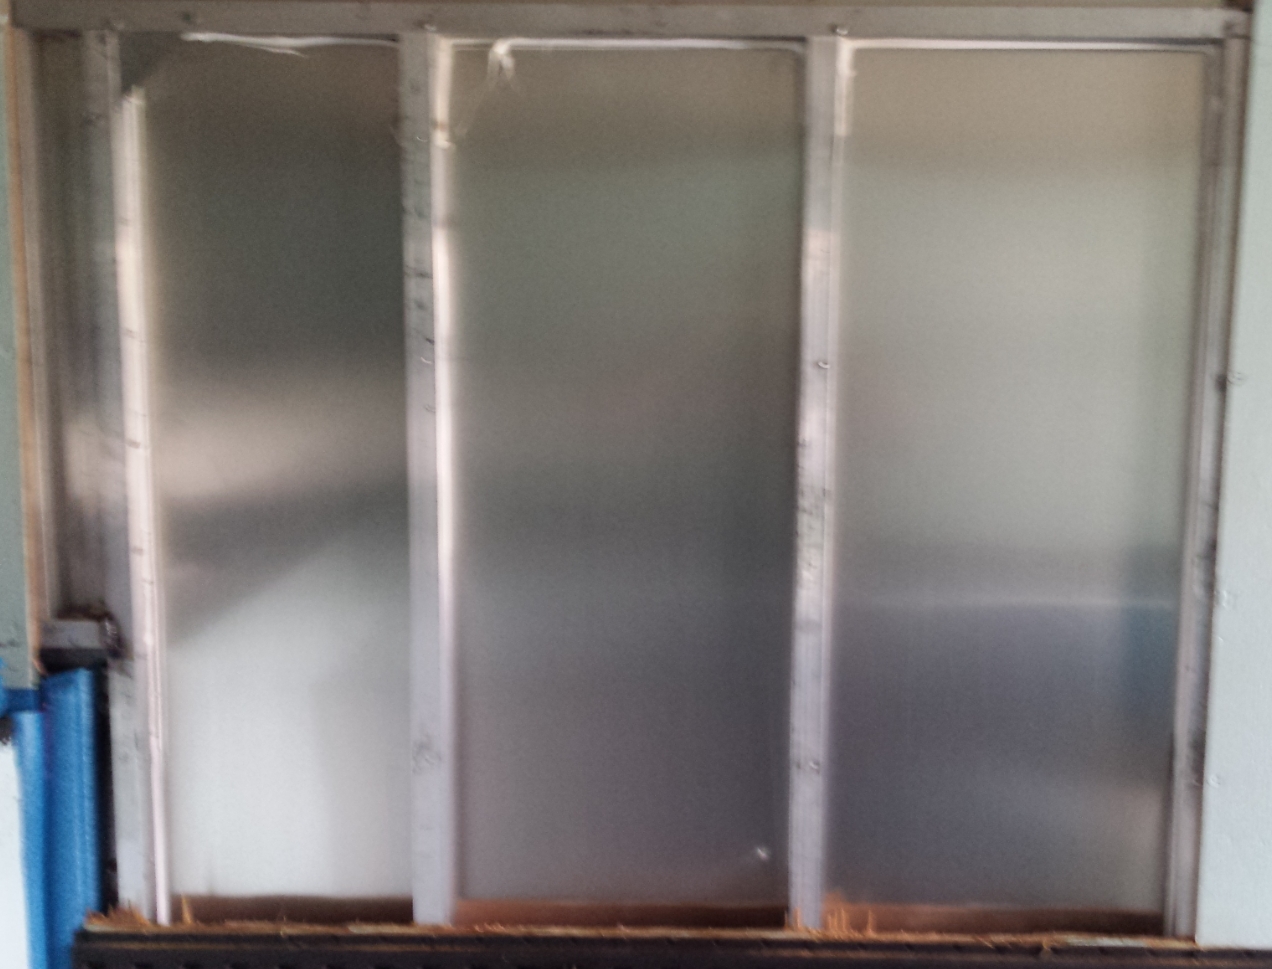
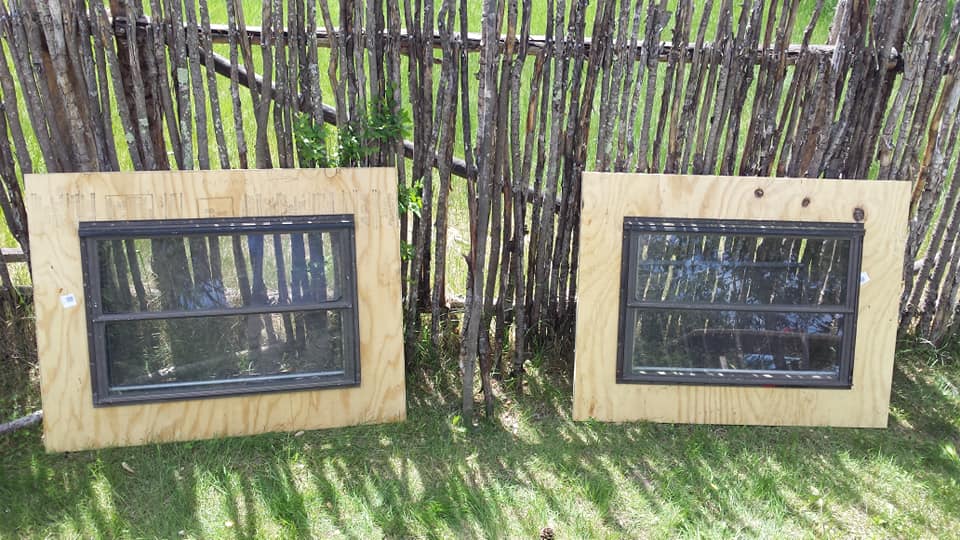
3. Putting in windows! Or at least one window. No... I'll have enough time for two. Anywho...
I've removed a section of wood paneling from the left and right side of the van (towards the front) to see what I was working with: the supports are I-beams, which wasn't what I was expecting. Thought they'd be the bent U shaped tracks. Anyway, after removing the panel, I have an area roughly 47-1/2" by 37-1/2" to work with, with four beams (two on the side, two in the middle). I'd attach a picture, but I'm still waiting for it to upload. The I-beams have about an inch, 1-1/4" gap; because of this, I glued two 1/2" thick sheets of plywood together. I don't know how wide I'll be making the plywood frame. I'm thinking 6" wide for the top and bottom, and however wide it needs to be to fit within the I-beams, but that's something to sort out Saturday.
I admit, I'm a wee bit nervous. I know I can do this, I know it isn't a big deal as far as modifications go (only in that people do this all the time), but man...
4. The screen partition has shifted enough in that the two bottom pieces of plywood have loosened slightly. This isn't a big deal, as they really weren't fastened all that well; just need to run a couple drywall screws through, and it'll be good.
soothsayer Journeyman
Posts : 1516 Join date : 2011-06-30 Age : 51 Location : Right here.
Subject: Re: On the Road Again Wed May 30, 2018 9:34 am
Windows
The picture isn't in focus, but you can see what I'm working with. To give a reference, the black bar on the bottom of the image is the e-track; the blue foam is the corner between the loft and the main body; the triangular piece on the frame (top left) is, well, the top left. From top to bottom (inside frame) is 37-1/2", from left to right (inside I-beams) is 47-1/2". The I-beams have an inside depth of roughly 1-1/8".
My plan is essentially to follow the video I posted earlier, as that was the route I was leaning towards. I could get away without having to frame the window, but I want to take that extra measure. Just like with the sealing or caulking of the window: I'll be using buytl tape to along the actual window frame, caulk around the screw holes, caulk around the surface of the plywood frame, and self-sealing screws... I'm going all out, I know, but rather do a little extra with this than having to face repairs in the future.
Oh! Unlike the video, the aluminum panels aren't affixed by screws; mine are riveted in place. To remove, all you need to do is drill them out. Also, unlike the video, I probably won't remove the aluminum panel with the oscillating saw. I'm thinking my saws-all, will go quicker, but we'll see.
When the windows are in place, I do plan on putting the wood panel back up.
soothsayer Journeyman
Posts : 1516 Join date : 2011-06-30 Age : 51 Location : Right here.
Subject: Re: On the Road Again Mon Jun 04, 2018 9:07 am
Updating the updates
1. Putting in fender washers to help hold up the paneling was an excellent move! Remove screw, slip on washer, reinsert screw... better than new. My concern with the thickness of the washer was unwarranted, as they appeared to be thinner than the paneling. When they were re-screwed, they easily held the panel tight; some of the washers bent as they went in (looking like mushroom tops), but that's a good thing, as they still grabbed the panel.
2. As for the windows, I put one in this past Saturday. Could have done the second, but I didn't want to chance my doing something stupid due to a growing sense of frustration. Frustration wasn't towards any one thing, but a slew of small things spread throughout the day. You know, normal day stuff. Anywho...
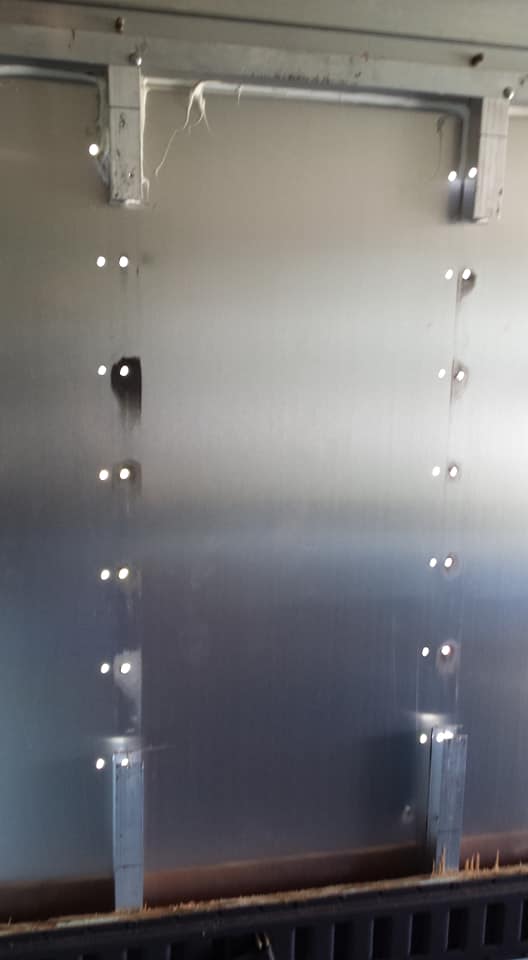
After having glued and pressed two 1/2" thick sheets of plywood together, I cut them to have a six inch frame; the interior holes were done to match the window, as they (the windows) weren't exactly square.
As my I-beams were riveted in place, I drilled next to the rivets so I knew which ones I had to drill out / remove. After the drilling, I cut and removed the I-beam with an oscillating saw. I then cut/split the I beam so that it could be folded as the above video shows: one portion for the horizontal, the other for the vertical.
With the e-track in the way, I wasn't able to screw the horizontal folds into the frame; I attached the vertical piece with basic screws. With the frame in place, I easily cut the panel with a sawzall. Easily.
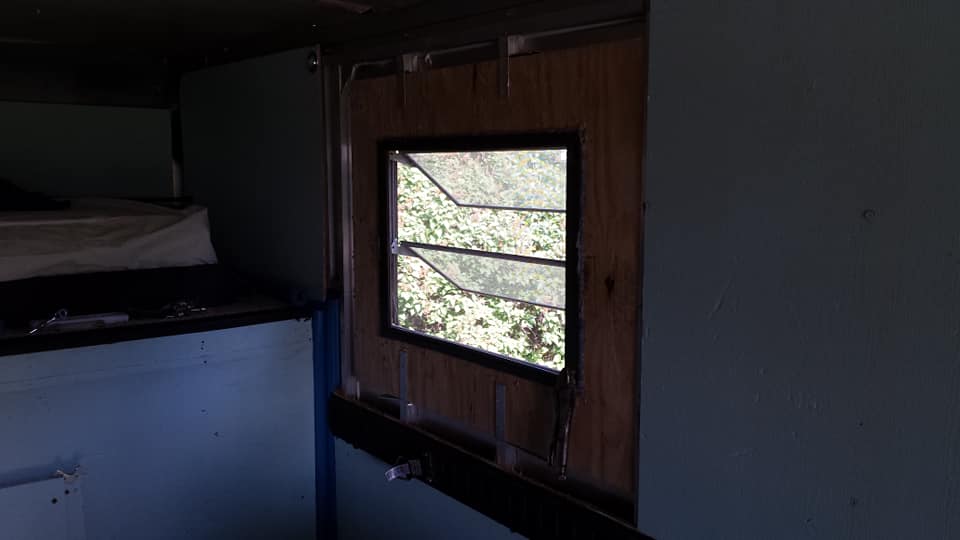
Before popping the window in, I went around the trim that would go against the van body with some butyl tape, and then went along the inside seam with some flexible silicon caulk; as you can see by picture #3, I also filled any gaps with the caulk. I attached the window with self-sealing screws. Between the tape, caulk, and screws, this window should be pretty much water proofed!
I did screw up on one part. I had intended to pop the original panel back in place after cutting out the hole, and then trace the hole onto the panel so I could cut that... with window in place, I can then pop the panel back up and use basic floor trim as a window frame. That didn't happen, at least not with this window (making mental note to do it with the second). It isn't a hard mistake, I can always take measurements and go from there, it'll just take a little longer.
After Saturday night's steady rainfall, I checked on my window, and there were no leaks. Granted, it wasn't a hard downpour, but it was a steady rain... regardless of the type, if there were any leaks, they'd have manifested.
Tonight I am hoping to have the second window in. Frame's done, original panel is out, all I have to do is remove I-beams and essentially cut out siding. At the very least, I can remove I-beams today and install tomorrow, but this shouldn't take more than an hour.
soothsayer Journeyman
Posts : 1516 Join date : 2011-06-30 Age : 51 Location : Right here.
Subject: Re: On the Road Again Tue Jun 05, 2018 7:50 am
Updating the updated updates
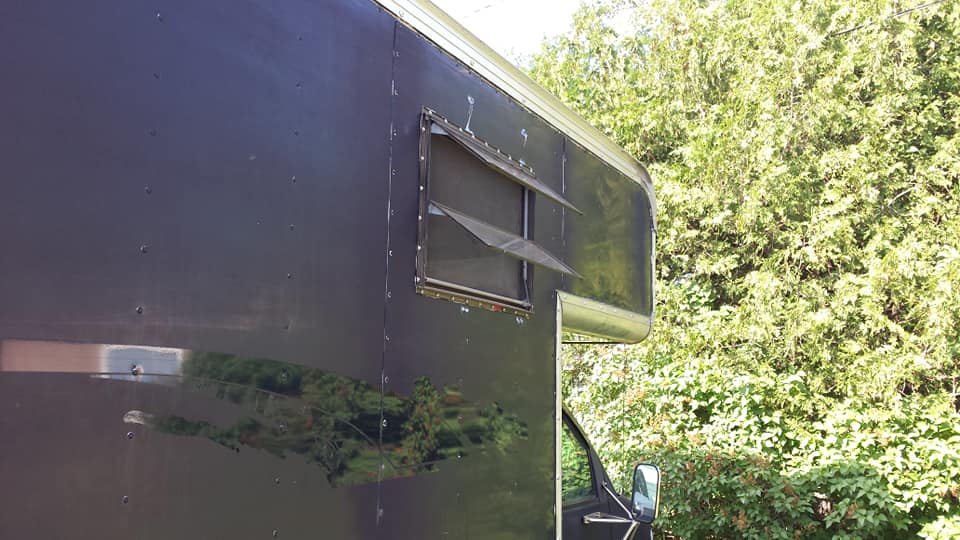
Window number two has been placed.
A bit fun putting this one in. All day, the weather reports were saying "no rain," but it sure looked like it. Gotta trust the experts, right? Landed up sprinkling a few times during the install; luckily, didn't get any worse than that.
Because of the rain and the way things looked, I didn't take the time to trace the hole onto the interior panel. However, I did think of a way for me to easily do this: cardboard pattern. Going to put up some cardboard, piece by piece, and make the pattern I need.
With the second window in, things are looking a bit better, I think!
soothsayer Journeyman
Posts : 1516 Join date : 2011-06-30 Age : 51 Location : Right here.
Subject: Re: On the Road Again Fri Jun 08, 2018 9:44 am
Aaaaaannnd done
Yesterday afternoon I managed to put the wood panels back up. The first template I made was a little off; I didn't align the panel before measuring, or else I would have seen that the panel was 1/4" higher than the one next to it (thought it was flush), so the cut out is a little off. It isn't a big deal as I was planning on putting in some trim, but still... The second window was much better.
Anywho, after cutting out the hole and dry fitting, I applied a healthy dose of Liquid Nails construction adhesive to the window frame and the aluminum frame, put panel in place, and attached it with the original sheet metal screws (to the framework) and wood screws (to the window frame). The panel is going no where, that's for sure. I then filled any gaps with the remainder of the adhesive.
With the panels back in, I'm feeling a little better about this. Was getting kind of down for a while there, but I think that was because I saw what a mess things looked. And now, with the windows in place and highly secured, I can declare things done. All that is truly left is to run a gas line from one of the external storage boxes to the back of the living area, but as that simply entails securing a line to the bottom of the body (running hose through PVC, affixing to the wooden underbody), it really isn't a complicates issue; so again, all done.
Tonight I put up curtains and clean up the mess. Depending on how motivated I am, I may put up a bunk ladder. Will just have to see how things go.
soothsayer Journeyman
Posts : 1516 Join date : 2011-06-30 Age : 51 Location : Right here.
Subject: Re: On the Road Again Mon Jun 11, 2018 11:15 am
We come to a close
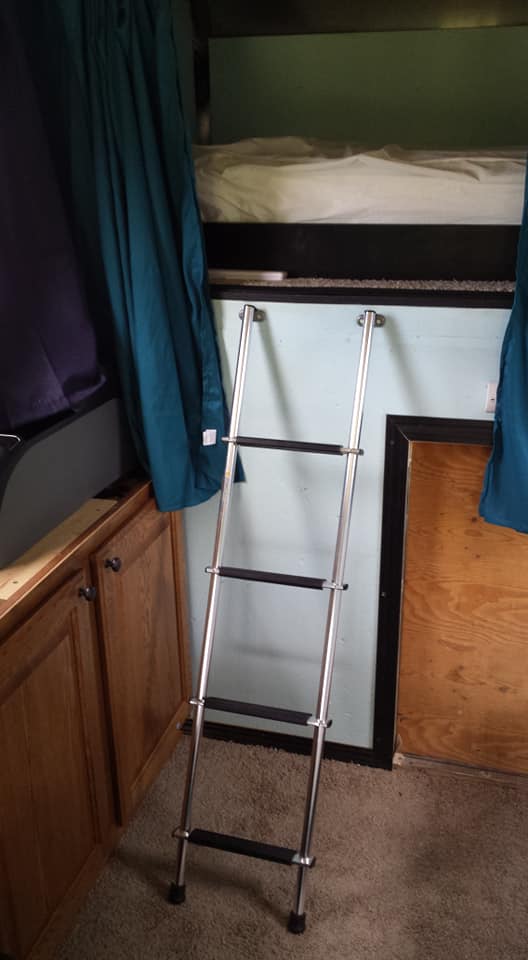
As of Sunday afternoon, The Doghouse, for most purposes, is done. Completed. Finished.
Wooden panels, as well as curtains, are up. Bunk ladder is installed and weight tested. Insulation at the corners is installed. Cabinet knobs have been swapped and placed properly. The deck partition has been secured; foam insulation wedged in between panel and frame to prevent bugs. Rivets I accidentally removed replaced with self sealing screws.
Only two things remain. One: clean out the external storage boxes of the previous owner's stuff ( a lot of tile in them). Two: run a propane line from a storage box to the back of the van body. Neither of these are important... or rather, neither or these are high priority.
Everything that is left to do within the van is essentially cosmetic or optional. That's it. Everything I have left to do is optional, and I couldn't be happier! At some point this week, I put up a vertical storage rack to hold fishing poles and secure a flat screen TV so that it doesn't fall. Oh! Almost forgot: install the retractable screen for the door leading to the cab. A couple screws for everything mentioned, a few minutes for each. Optional. (but I did buy the rake and the fasteners for the screen already)
Yay!
Took the van out for a drive last night as well, to see if the windows would fall out or jostle loose or anything. They held up beautifully.
In looking at the photos, all told I spent $80 for the windows (still have six more), $100 on the mattresses, $40 for the cabinets, $20 on the couch, $20 on the bunk ladder, $10 on the mirror, guessing $160 for carpeting, $20 for the two vents, guessing $100 on lumber... probably another $50 for hardware, $25 for the stove, $50 for the heater, $15 for the external supply outlet, $20 for the normal outlet (has USB, could have gone cheaper)... oh, curtains and rods... $110? That brings us to $820. A lot of the stuff I picked up at Goodwill or through eBay or had in the garage, and I'm sure there are items I forgot to mention, but for the sake of argument, let's just say that I spent about $900 (at the most), including caulk and paint and other minor things. With the cost of the vehicle, taxes and registrations and auction fees, everything comes in at under $5000. Yeah, you could buy a well used class C motorhome for that price (excluding taxes, title/registration, repairs), but you wouldn't be able to set it up the way you want to. Something like this, having a blank slate or unlimited customization...
soothsayer Journeyman
Posts : 1516 Join date : 2011-06-30 Age : 51 Location : Right here.
Subject: Re: On the Road Again Wed Jan 02, 2019 11:01 am
We've got water!
Not every campsite has available water, whether that be from hose or sink. I purchased a couple water storage canisters for that purpose... and to meet the "does your camper have a water tank or external hookup". I still have those two canisters, but now I've got something even more: I'm putting in a functional water system, complete with fresh stored water, external hookup, sink, and gray water storage.
The plan is illustrated below. I'd be using an old fashioned hand pumped pressurized weed sprayer at the core of my system: pressurize the sprayer, discharge into a mixing bowl (drilled out to be a sink), which then drains into a storage tank.
You'll note a tee shaped pipework with three red lines: the red lines are cutoff valves, with the one going to the bottom (with gray / blue circle) leading to the external hookup. Open external and sink / turn off pump, and the water comes in from the outside; open sink and pump / close external, water comes from pump; open external and pump / close sink, refill the water tank. The external hookup is simply a faucet spigot leading through the Dog House. Easy enough!
I've already gathered the essentials: ordered a 4.5 gallon stainless steel weed sprayer from eBay (more durable than plastic, can heat up water in it without worry) and picked up a 7 gallon water tank from Walmart; will be hitting Goodwill this afternoon to look for a stainless mixing bowl. I'm planning on putting this together this coming spring and having it ready by the Devils Tower trip.
I also bought a water filter and water pressure regulator. From what I've seen, some campsites have a high water pressure that might damage some pipework; seeing as how mine is cobbled together, a regulator was a no-brainer. As for the filter, again from what I've seen, some sites have bad tasting water... figured why not get a filter, won't hurt anything and it'll look as if I know what I'm doing.
{EDIT}
Stopped off at Goodwill, but after looking at some mixing bowls and mentally seeing them in action, I realized that a mixing bowl may work as a bathroom sink... but it really doesn't do anything as a kitchen sink. Not deep enough, too much of an inner curve (water splash), so I started leaning towards something a bit more utilitarian.
To the Resale shop we go!
At the Resale Shop (ie, Habitat for Humanity store), I picked up a small utility sink that appears to be about the same size as the blue water canister. Gives me the capability to wash dishes, hair, and maybe even some light laundry. Not bad, not bad at all. As far as linking the tank to the sink, I got a hose from Menards (1" inside diameter) that ought to do the trick; I'll have to rig something to go from sink to tube... but after having switched out a few sinks at home, this shouldn't be an issue.
soothsayer Journeyman
Posts : 1516 Join date : 2011-06-30 Age : 51 Location : Right here.
Subject: Re: On the Road Again Mon Apr 15, 2019 2:04 pm
kitchen remodeling
This past weekend I started to remodel the kitchen area; the way things were, there would have been no room for a water system (at least, not the one I had planned). I don't have any pictures, but I'll try my best to describe things to you.
If you scroll up to the August 21 2017 post, you'll see a picture of two cabinets. I now have the open one in the corner (of the screened wall), facing out, while the one with the door is against the same wall, just moved so that it is against the open one; 3/4 of the open shelves are covered by the doored cabinet. This gave me an extra foot or so to work with, which is more than I need.
So now, instead of everything being along the wall, it is 7 shaped.
With the water, I am putting the grey water tank and tub next to the doored cabinet; next to that I'll be putting the pressurized tank. This puts things close to the overhead door. Coming off of the tank, but along the door, I'll be building a small shelved area to store the two jerry can style water containers, and to give me a little bit more kitchen storage.
...
Oh, hold on.
Keep in mind that there will be a counter top going around the pressure tank; it will not be open or exposed like this.
I am backtracking on making an external hook-up, at least for now. I need to figure out how I want to do that. My reason is that, when painted black, I can remove the tank and set in the sun for a couple hours or so and it will warm up the water inside (any color tank would, but black retains and absorbs the heat better and quicker). I mean, I could still do the system I originally thought of, but there isn't an immediate need. If anything, for the sake of "technicality", I can just install a closed pipe and spigot and say "why yes, it does have a water hook-up".
Along the side of this counter that faces the overhead door, I will be putting in one of those rubber base boards to help prevent water from coming in under the cabinets. This has been a minor issue with the truck. Though not a lot of water comes in, there is enough where it trails along the wall and up to the carpeted area; never enough to mop up, just enough to leech through. If I dam this up, the water can just drain out through the floor. I also intend to drill a couple more holes in the recess of where the door fits. That should do the trick, but it doesn't hurt to have a backup plan.
Purchased a small shower head, believe that I can unscrew the brass nozzle from the handle (of the pressure tank) and attach the shower head. Leave the trigger assembly as is. This will be good for both washing hair and washing dishes. With the tank removable, I can also take it outside for a make-shift shower. My only concern is making a funnel thingy from the basin drain to fir the hose, seeing as how I'm not using standard plumbing in the camper. Hell, in the very least, I could use a funnel: epoxy and fiberglass the funnel to the basin drain, hose clamp, all done. But I won't. I may be going cheap, but I don't want it to look that way... plus I want things in such a way that I can modify or change them later on.
Between the two jerry cans and the pressure tank, I'll have roughly 17 gallons of water. That really isn't that bad, all things considered. Currently just using this for travel; bare in mind that I do have a 50 gallon water tank built for RVs if and when I need to use it. I'm not because of size restrictions and that, in order to have a good flow, I'll need to install a water pump which requires electricity. And that means batteries, whether solar power supplied or deep cycle recharged from van engine. Nope, keeping things modular like this just makes more sense for now.
...
On a side note, I upgraded the 19" television to a 24". The 19 was adequate, but the 24" fits better.
soothsayer Journeyman
Posts : 1516 Join date : 2011-06-30 Age : 51 Location : Right here.
Subject: Re: On the Road Again Mon Apr 22, 2019 4:09 pm
final touches
1. Framed the kitchen water system; may be making it so the counter top wraps around the entire kitchen / even level. Right now, the cabinets with the stove and the supplies sit about 6" below the sink height. It ain't bad, just doesn't look good.
2. Ordered a manual / non electric 5 gallon washing bin. Think of it as a bin that spins with a hand crank. Two minutes worth of spin, drain, add rinse water, a few seconds of spin, drain, and done. May or may not be needed for this trip, but it'll be good to have... especially since I'm making this as prepper friendly as possible.
3. Ordered a 15' by 25' white heavy duty tarp. Going to attach some heavy strength hook along the top length to secure the grommets, use tent spikes to nail down the hanging end, and done: removable awning to help make shade and keep the interior cooler, set up camp outside.
4. Regarding "prepper friendly", looking into solar panels, just enough to recharge batteries / run small appliances. Work on this next year.
5. Started cleaning out and organizing the utility boxes. I had an extra plastic utility shelf, so I trimmed the width of the shelves so they could fit in the boxes; keeps items off the bottom, in case any water leaks in. Next couple days looks like they're going to be wet, so I won't be doing much more, at least not until the weekend. At that point, I hope to finish the water storage cabinet and the boxes.
soothsayer Journeyman
Posts : 1516 Join date : 2011-06-30 Age : 51 Location : Right here.
Subject: Re: On the Road Again Wed Apr 24, 2019 9:29 am
mobile cabin
Things are running very smoothly right now. Have the vehicle scheduled for an oil change, radiator/transmission flush, bearing greasing, spark plug change, and a new belt (keeping the old one as a backup). Cleaned out and organized the utility boxes, having lined the bottom of each with a plastic shelf that was trimmed (that sounds familiar... did I already post that?). Pick up an older wooden clothes wringer this afternoon, should prove useful.
Then today I've ordered a manual water pump; not a hand crank type, but one of those lever styles with the diaphragm. Able to move water up from 12 feet and the back out 12 feet. Not necessarily needed, but would be handy to have, especially since I'm making things prepper friendly.
Let's see, what else... what else...
Nope, I think that's just about it.
soothsayer Journeyman
Posts : 1516 Join date : 2011-06-30 Age : 51 Location : Right here.
Subject: Re: On the Road Again Thu Apr 25, 2019 2:05 pm
Pioneer Kit
Back in the day, pioneers set forth with specific tools; this continues through today with military vehicles. You may have seen images of such things dating to World War Two, with tanks and jeeps with tools strapped to their sides. The tools? Most commonly shovels, axes, and picks.
With my intentions of the Dog House as being a prepper friendly mobile camper, I've procured a variety of tools. Many of these I already own, but I want to keep a distinction between home tools and those I would have stored in the camper.
I bought and ordered tools from the same company, in an effort to give things a uniform appearance: Fiskars. You may recognize the orange and black coloring from Walmart's crafting section (scissors in particular) or their home and garden area. I originally wanted to go with wooden handled tools for ease of replacement, but after watching just how easy some handles break if hit wrong... plus watching videos of how well Fiskars' tools hold up when hit and abused (and a lifetime warranty to boot), I really couldn't pass that up. These are literally "the last {name of tool here} I will ever need to buy".
So, what did I all buy?
Pick/Mattock (a pick with a hoe on the end)
Chopping Axe
Hatchet
Brush Axe
Axe and Hatchet Sharpener
Bow Saw
another type of saw
Club Hammer
Digging Shovel with D-handle
Garden Knife
At some point I'll pick up a couple extra bow saw blades, wood splitters, and a chisel set with hammer. Suppose I could always get a maul for splitting wood, will just have to see.
In hindsight, this project of mine has been amazing. What started off as being a convenient tent on wheels transformed into something more, progressing from tent to camper to RV and now, apparently, a full blown pioneer cabin on wheels, completely self sufficient (at least it will be once I install solar panels). There are some minor projects that could be done to improve things, but those are neither here nor there: lay a sheet of plastic on the floor, then a layer of carpet insulating foam, then carpet; remove plywood siding, place insulation, reinstall plywood siding. But those are things that could quite honestly be done at any time.
The other day, one of the boys asked me what a prepper was (I was describing the camper being prepper friendly). And now, upon further thinking and realization, I am not going to survive... I'm going to thrive. Ought to be a bumper sticker.
...
Ought to consider putting that on the back of the Dog House.