COT2
|
|
| | Sucker Punch, minigun samurai |  |
| | | Author | Message |
|---|
soothsayer
Journeyman

Posts : 1516
Join date : 2011-06-30
Age : 52
Location : Right here.
 |  Subject: Sucker Punch, minigun samurai Subject: Sucker Punch, minigun samurai  Fri Dec 01, 2017 8:26 am Fri Dec 01, 2017 8:26 am | |
| - the following post was originally posted under "costume and clothing designs, ongoing" wrote:
Samurai 2018
On a different thread I wrote how I condensed and combined my two work areas so that I could see everything I have all at once / everything would be in reach. It's a lot easier keeping track of things that way, and is a little bit more motivational when you can see all your stuff, without having to stop and hunt for something. With that said, I believe I am ready to work on my last posted costume idea: samurai armor.
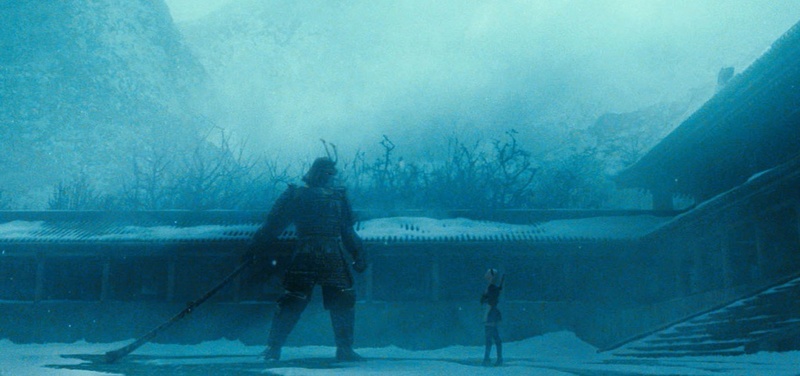
As inspiration, I want to model my cosplay after the minigun toting samurai from the movie Sucker Punch. I found an excellent reference source at this link, but there are plenty of video clips on Youtube that I can always go to as well. I am not planning on making a complete or exacting replica though! I am only taking inspiration! Basically I'm going to be making my own samurai with a minigun.
The key differences are going to be in the head area, both with the mask and the helmet. While I like the head area of the Sucker Punch samurai, I just don't know if I can get the mask right, not to mention the blending of the horn into the helmet. Well, the horns I can at least try, any gaps or seams can be taken care of with spackle or some sort of contour putty. And with the horns actually being an octagonal curve instead of a true horn, it could probably be done.
...
Anyway, In looking at the reference photos and images I pulled off the internet, samurai armor doesn't seem to be all that complicated. Sure, there's detailing to consider, but all in all, not too bad. In this build, I'm definitely going to need to break things down and just focus on one aspect at a time. The first area, if you couldn't have guessed, is the head area.
In looking at Japanese helmet design, the kabuto (the helmet), when broken down into its components, is a bowl with an attached visor, a few neck protecting bands, the two curved pieces along the side of the helm, and the central crest. Pfft, that's it? With each of those portions, in recognizing the shapes and the pieces, the helmet will be easier than though. Everything else is just detail work.
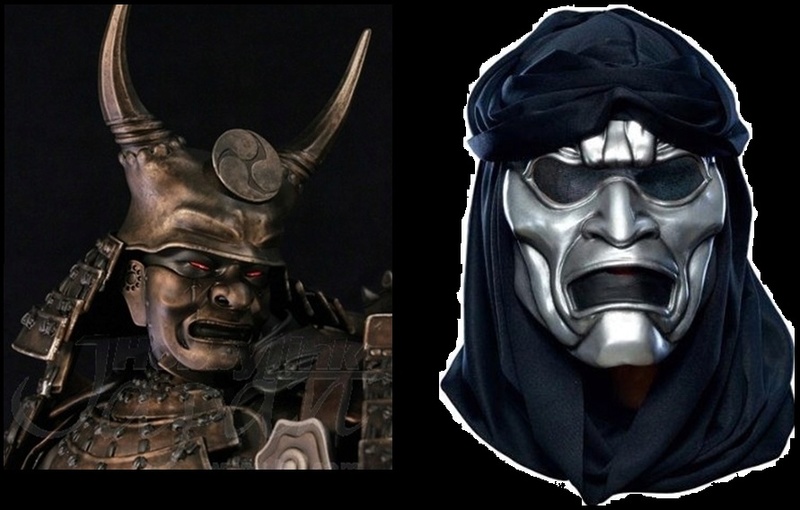
The mask is a bit more complicated. I've proven to myself that I can make foam masks (my Dr Doom one turned out damn good), but with Doom, those were hard shapes, while a samurai's face mask has curves and is more organic. I may be able to get the basics, but the nose is going to be a pain. And then to keep the rigidity? I don't know. Seems something more fitting for a resin or fiberglass project. Luckily, I do have a fix: I've got a small selection of Halloween masks that I can easily modify. I just need to determine if I want the full face mask or the type that go from the nose down (I have both tyupes at home, so it isn't an issue). Being the chrome masks, I'll need to do a little sanding, no biggie.
I guess then all I have left is to figure out what crest to use on the helm, and whether or not my mask is going to have a mustache. I do have bristled brushes I can use; originally bought them to use the bristles as grass for model basing.
But yeah, there you go. Broken down shape by shape, the helemt, probably the most complicated part of this, really isn't that difficult.
"But the minigun! How you going to do that? That's the hard part!"
No, not really. Some PVC piping, some empty bottles, and I figure an old battery operated drill, I'll have a spinning minigun (and should I make it unmoving, even easier). For the belt feed, you would not believe how many lengths of Nerf ammo belts I have. I'm sure I can cobble something together.
The rest of the body armor is nothing but banded plates. Easy. The clothing underneath will just be sweatpants and sweatshirt.
If I was properly motivated, I could easily spit this out in a couple weeks. That's without detail. As I've got a year for this (this will be for Halloween 2018 after all), I've got plenty of time for all the finer pieces. Chest rivets? Googly eyes or diamond rivets. I've been buying up all the belts from Goodwill that have those diamond rivets, got a nice baggie full of them... but the googly eyes have the right shape. Tied leather knots? Crafting foam. Etching? More crafting foam or utility knife to score the surface.
So if I just focus on one piece at a time, the head area one month, the mini gun one month, chest and back armor, shoulders, hips, gauntlets, boots, detail and paint... that's eight months time. Halloween is in eleven months. Gives me time aplenty to do the armor and do it right AND plenty of time to lose weight. | |
|   | | soothsayer
Journeyman

Posts : 1516
Join date : 2011-06-30
Age : 52
Location : Right here.
 |  Subject: Re: Sucker Punch, minigun samurai Subject: Re: Sucker Punch, minigun samurai  Fri Dec 01, 2017 8:53 am Fri Dec 01, 2017 8:53 am | |
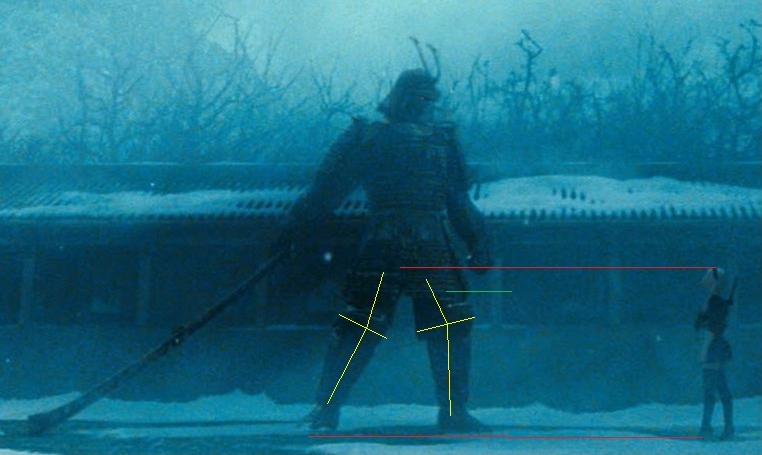
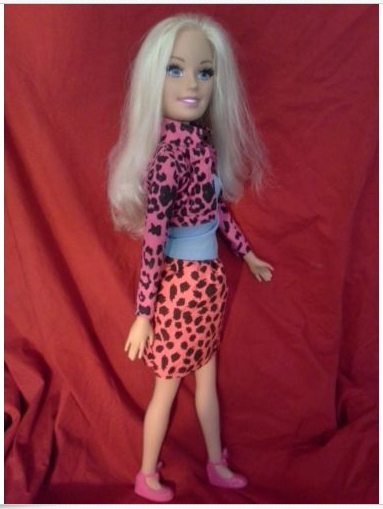
| pieces update1. I've been trying to figure out how to do the horns on the helmet, and I figured out that the best way to do this would probably be having to carve and sand them from a foam insulation block. They may not be symmetrical, but they'll be close-ish. 2. Trying now to figure out how to do the face mask. I thought using one of the Halloween masks I have lying around would work, and I may still land up using one... it's just the nose I have concerns about. Do I try to carve one from foam? Do I go and buy a Groucho Marx nose / mustache novelty mask? If I go the foam route, should I make the entire manpo (samurai face covering) out of a foam block? If I do that, it'll look better, but there's a chance of breakage. Decisions decisions. 3. I got a $4 battery operated / cordless drill (with charger!) from Goodwill that works, so I'll be taking that apart for the minigun. A combination of sewing with wire and glue will allow me to link the Nerf ammo belts together to make a longer more acceptable belt. As far as the face on the ammo drum (backpack), I'll be using a skull I made with an empty milk jug and a heat gun. 4. To keep the scale of things, I went over the samurai fight scene and found that the below image to be the best as far as height of characters go.  Noticing that the placement of the feet (for both characters) doesn't necessarily give the best indication of height (next picture), I reasoned that if they were standing back-to-back with heels touching, the top of Babydoll's head would be about mid-calf.  On me, this would make Babydoll to be roughly 28". I found quite a few Barbie's at this height on eBay, and after some searching, I found one that came with an outfit that would require just a little rework. All I "really" need to do is dye her outfit and make some minor hem or seam adjustments, paint the stockings on / paint her shoes, make a sheath and pistol, heat her joints to pose properly.  My intentions are to pose her running up the minigun. I may use some clear plastic and make a stem, making it appear as if she's jumping, but you get the idea. I was originally going to use a normal sized Barbie doll (this idea came to me while driving home), but after looking at the scene some more, that's what led me to the 28" figure. And yeah, I know the doll's proportions aren't correct (that's a damn big head), but as I'm only using this to give a sense of scale (and that it'd look cool running up the gun), I'm not too concerned. The main focus should be the samurai costume. | |
|   | | soothsayer
Journeyman

Posts : 1516
Join date : 2011-06-30
Age : 52
Location : Right here.
 |  Subject: Re: Sucker Punch, minigun samurai Subject: Re: Sucker Punch, minigun samurai  Fri Dec 01, 2017 2:35 pm Fri Dec 01, 2017 2:35 pm | |
| mask and updatesWait, what's this? How can I have an update when I already posted an update earlier today... while still being at work between the two? This is madness! I've just been thinking and planning is all. Was looking at pepakura templates, figuring I can always transfer them to craft foam (which is possible). Was also thinking some more on just carving the mempo out of thick pink insulation foam (of which I have plenty of, and the tools to do this as well). I might still carve something, just so I can get practice. Anyway, what I finally settled on was just buying a mask. I know, I know, it's a cop-out. Cheating, even. But not really. Below you'll see the mask I've bought, along with a facial of the samurai.  There is a nice base for me to work on; however, there are a few cosmetic changes I'll be needing to make. Most of them are plainly obvious, so I won't go into details. The main things that I will make mention of are: 1. Cut the line from beneath the eyes, so that all I have is the nose / mouth portion of things, and not the eye covering. Removing the hood as well. 2. Fill in the lines from the around the chin and those running along the jaw (not the mouth line). 3. Adding teeth. 4. Adding side panels. 5. Perhaps adding foam to the nostrils to build them up. It all depends how things look. 6. Add the various scratches. Looking at the pepakura stuff, I could have made this. Not easily, but still could have done so. I'm just saving myself the headache. The other thing I wanted to add is the scene I'm essentially replicating, for those who haven't seen the movie Sucker Punch.  | |
|   | | soothsayer
Journeyman

Posts : 1516
Join date : 2011-06-30
Age : 52
Location : Right here.
 |  Subject: Re: Sucker Punch, minigun samurai Subject: Re: Sucker Punch, minigun samurai  Mon Dec 04, 2017 8:23 am Mon Dec 04, 2017 8:23 am | |
| order updates
Checking in with eBay and Amazon right now.
1. The Barbie, as of 0207 this morning (December 4), was in Green Bay. Excellent! I should be able to start posing and painting it by the weekend! This is being shipped by the USPS.
2. The mask is "in transit", with an expected delivery of Tuesday December 5 (via UPS)... though it also says it may not be until the 6th. Either way, still a cool thing, and once again, can easily begin working on this by the weekend. I was all set to start working on the helmet yesterday, but I realized I may need to wait until the mask arrives; that way, I know how wide to make the helm so that things aren't too tight.
3. I did order a couple books, but they aren't relates to this build: Foamsmith: How to Create Foam Armor Costumes and Foamsmith 2: How to Forge Foam Weapons, both of which were written by Bill Doran of Punished Props. May I say that he has an excellent Youtube channel? Amazing work! Anyway, ordered these on November 28 through Amazon, has an expected delivery between December 4th and 8th, and they haven't even shipped yet. *sigh*
...
As an update, I'm working on a word document right now. Each section covers a portion of the costume and what I have to do for that area (helmet, mask, backpack, gauntlets, boots, torso, hips, shoulders, doll, minigun). Much easier and less daunting to have things broken down like that instead of trying to view the costume as a whole. | |
|   | | soothsayer
Journeyman

Posts : 1516
Join date : 2011-06-30
Age : 52
Location : Right here.
 |  Subject: Re: Sucker Punch, minigun samurai Subject: Re: Sucker Punch, minigun samurai  Tue Dec 05, 2017 9:01 am Tue Dec 05, 2017 9:01 am | |
| doll updateThe Barbie doll arrived yesterday. On one hand it is better than what I had anticipated... on the other, well... the only joints are the shoulders, head, and hips. Not ball joints, but swivel. There is somewhat of a joint in the elbows, but not enough to get a full bend (or a 45* angle for that matter). The knees are solid. And speaking of knees, the legs are constructed out of a hard plastic, whereas the arms are of a rubber kind; that might prove difficult to heat and bend. On to the good stuff!  I've attempted to scale these images to each other. The first is Emily Browning, the actress who portrays Babydoll in the movie. The second is my Barbie doll which stands at 28 inches, and the last is a licensed figure of the character. There may be some discrepancies in the scaling, but for the most part things are pretty close; if I could find poses that were the same, that'd be better. But still, for this it is close enough. With the heights being similar, the biggest flaw you can see is the size of the head, but I knew this coming in. Ankles and knees are close, if not exact; pelvis and hips as well. Breasts and sternum are a little lower on the Barbie, but that could be because she might be leaning forward a little; if she wasn't leaning (ie, if this image does have her standing straight), the difference isn't really that bad. Collar bone and shoulders are low on the Barbie, almost looks as if the difference between this and the chest are the same. The neck seems to be lower as well; it does appear as if the neck to shoulder to sternum is keeping the same ratio. Same with the head. Now the head is obviously bigger, with the doll's chin at the same level as the shoulders on Emily and the figure. If I were to do anything to make the head scale more realistic, that would throw off the neck/chest proportions. All in all, this doll will work. It isn't the best, but that's only because of the head. The shoes are similar in that they are all high heels; I'll just need to remove the bows from Barbie and maybe attach a front strap (maybe some sanding away of the shoe opening). I'm just going to paint the stockings on. Raise the skirt, make it pleated (and paint, of course). Craft foam for wrist wraps. Craft foam headband. The jacket will be a little problematic: the front doesn't meet. However, the blue top Barbie is wearing is a tank top. I could remove the jacket sleeves and put them on the shirt. Trim shirt (midriff). Make a collar and tie. All told, the costume won't be that difficult. But the joints? If it looks like heating and bending isn't going to work, I may have to resort to cutting/sanding, and gluing... fill gaps with putty or caulk. Luckily, the joints are covered; the elbows with sleeves, the knees with stockings. | |
|   | | soothsayer
Journeyman

Posts : 1516
Join date : 2011-06-30
Age : 52
Location : Right here.
 |  Subject: Re: Sucker Punch, minigun samurai Subject: Re: Sucker Punch, minigun samurai  Wed Dec 06, 2017 9:35 am Wed Dec 06, 2017 9:35 am | |
| mask updateThe mask came in yesterday. I'm a tad disappointed in it, although I should probably say I'm a tad disappointed in myself. I didn't read the full description, failed to see that it is a vacuum foam mask. You know, one of those thin styrene masks. It isn't as brittle as a kid's mask that we all grew up with, but it definitely isn't as thick or sturdy as I would like. It's sturdy enough though; just can't stack anything on it.  Keeping in mind I did not have the mask on at the proper angle to match images, I did my best to position it. As you can see, for the most part facial features to line up, with exception to the chin... but really, who's going to notice. I see that on the original mask, the cheek rides a little lower than mine. I don't know if I want to trim things or not, as on my mask, there is a lip (you can see it going from nose to under the eye then curving back up) that adds a little stability. Also, if I trim things, it may expose the empty space under the cheek. Nope, better to leave things the way they are. Adding putty and perhaps crafting foam to the cheeks will help in making the mask look the same, but as long as I get those lines taken care of, it'll be fine. I'm just wondering if I should sand the mask or prime it in order to have the putty stick. Or, you know, leave things the way they are and just seal it when I'm done. | |
|   | | soothsayer
Journeyman

Posts : 1516
Join date : 2011-06-30
Age : 52
Location : Right here.
 |  Subject: Re: Sucker Punch, minigun samurai Subject: Re: Sucker Punch, minigun samurai  Mon Dec 11, 2017 9:10 am Mon Dec 11, 2017 9:10 am | |
| mask updateI believed that I had completed the mask portion this weekend, but now that I put the images side-by-side, I might have jumped the gun. In looking at things, I've noticed that the ear flap might be too wide, and isn't shaped exactly right. The shaping I can touch up, just need to flatten the bottom and make it more ear-like than curved, but the width is going to have to remain the same, and here's my reasoning. In looking at the samurai's mask, the face piece looks as if it ends right before the ear; the ear piece just covers the ear. With my mask, the face piece goes only halfway past the cheek. I could work on the mask some more, but is it worth it, only to extend the width by an inch or so? No, better to just trim the earlobe a bit and adjust the inside curve. Looks like there's a same lip around the earpiece as well that I could maybe apply, as well as some rivets. Minor details that probably could go unnoticed, but I'll take a gander at them regardless. The red portion on my mask is a layer of craft foam; if you look at the previous picture, my mask had a sunken-in cheek area, and so I used the foam to fill it. I also applied a few layers of kwik seal caulking putty to blend the foam in. This worked pretty good, and I'm happy with the results. Thought about using the caulk to touch up the seam around the chin, might just go ahead and use a strip of foam to fill it in first as well. It's one of those things where I could do it, but is it worth it? I think the mask is fine the way it is, all the nit-picking I'm doing is just nit-picking. Once it's assembled and painted, it'll look better... plus I doubt anyone is really going to notice the minor faults, not with having reference photos. With the mask done, I can start working on the helmet. Needed to do this so I would know how much room I had to work with (on the helm's inside)... though, now that I think about it, the ear pieces aren't even inside the helm, they're inside the neck guard. *sigh* I can make the helm portion as normal.  | |
|   | | soothsayer
Journeyman

Posts : 1516
Join date : 2011-06-30
Age : 52
Location : Right here.
 |  Subject: Re: Sucker Punch, minigun samurai Subject: Re: Sucker Punch, minigun samurai  Thu Feb 01, 2018 9:24 am Thu Feb 01, 2018 9:24 am | |
| helm assembly is DONEWith the exception of adding some velcro straps or whatever to hold the mask and helm in place, I can proudly say that the helm is finished. Complete. Finito. It took some time, but that's because I dragged my heels... was distracted... had other things and priorities. You know. Life happened. But at least things are done now! And truth be told, it doesn't look too bad. I see my mistakes, I can point out where things went wrong or what can be better, but, judging by my coworker's reactions as well as seeing the look on the mrs' and the boy's when I came up from the basement with it... oh yeah. Now, before anyone says "hey! your crest is backwards!" It's not. I flipped the picture to try to match the reference photo.   | |
|   | | soothsayer
Journeyman

Posts : 1516
Join date : 2011-06-30
Age : 52
Location : Right here.
 |  Subject: Re: Sucker Punch, minigun samurai Subject: Re: Sucker Punch, minigun samurai  Tue Feb 06, 2018 4:11 pm Tue Feb 06, 2018 4:11 pm | |
| all in the pastWhile hunting and searching for reference pictures, one of the things I did was look up costumes that came before. Some cosplay forum sites recommend doing this, and seeing if you can get in touch with the costume maker, for advice or to see how they overcame an obstacle. Weirdly enough, I wasn't able to find too many cosplay pictures on this costume. It's weird in that this particular subject has a toy, a wiki page, fan art, and so on. Not bad for something that was only in a five minute scene; and even then , he wasn't the focus for most of it, having to share that time with two other samurai and Babydoll. So without further ado, I just want to share with you the costumes that came before, or at least the ones that I found.  The first two images apparently were not from a comicon, but rather a Halloween costume (October 2017). ORIGINAL FILEThe last was, according to the source, taken at the Salt Lake Comicon in May 2016. ORIGINAL FILE | |
|   | | Sponsored content
 |  Subject: Re: Sucker Punch, minigun samurai Subject: Re: Sucker Punch, minigun samurai  | |
| |
|   | | | | Sucker Punch, minigun samurai |  |
|
Similar topics |  |
|
| | Permissions in this forum: | You cannot reply to topics in this forum
| |
| |
| |
|
