
COT2
|
| | | Model Crafting |  |
| | | Author | Message |
|---|
soothsayer
Journeyman

Posts : 1516
Join date : 2011-06-30
Age : 51
Location : Right here.
| | Subject: Model Crafting Thu Aug 11, 2016 7:49 am | |
| Over the past week, I've had some fleeting thought on model making (with kit buying in particular). While this hobby isn't as expensive as, say, car restoration or 40k, it can get up there with "good" models costing around $40 on up. Factor in that we have to travel 55 miles to go to a decent model shop, or that we have to purchase items online in an effort to find what we want, then that $40 model quickly becomes $60. Yesterday, I was looking at some pre-release Gundam models, when I had an epiphany... but first, the model that sparked this idea. 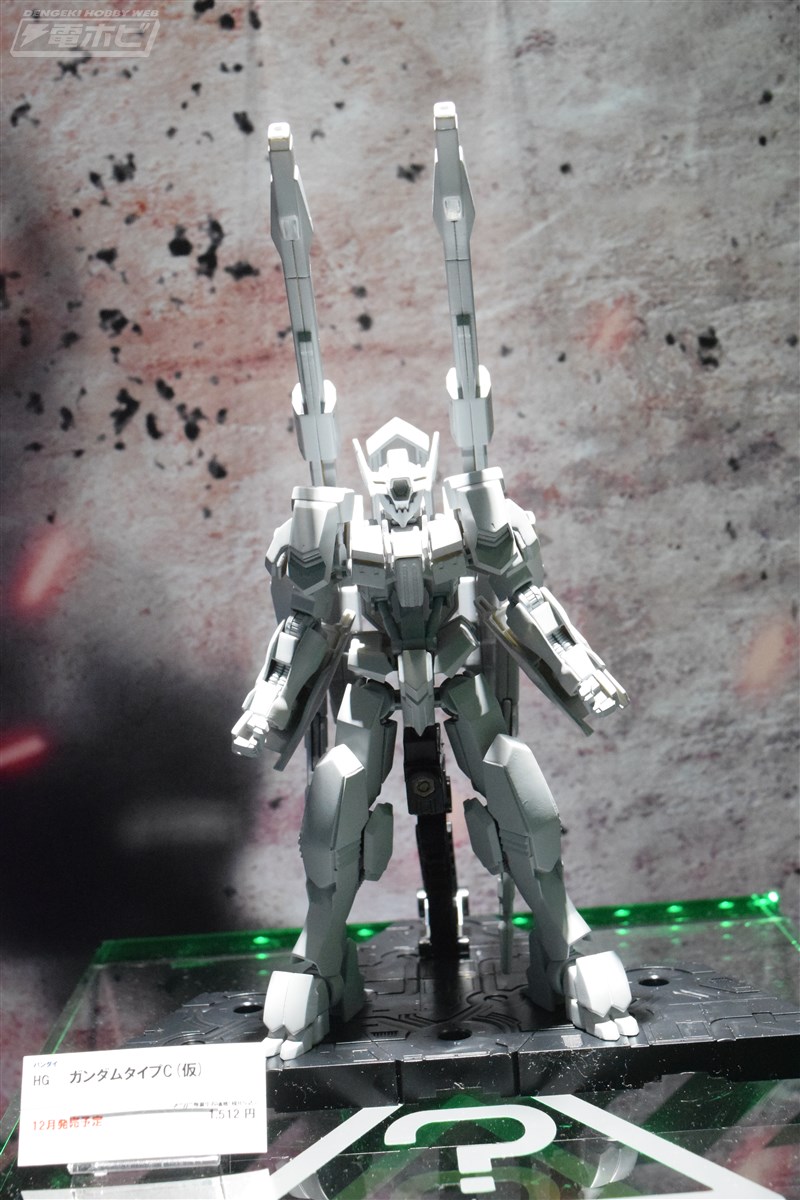  Looks pretty nice, don't it? Anyway, I realized that, in order to truly test myself, to see just where my model building skills are, I need to build from scratch. Take the above model as an example: it could be made with nothing but black and white foam board, the edges / pieces of the board cut at angle and glued together, maybe some spackle for gaps, or some sanded pink foam insulation for curved pieces. Suddenly, just like that, the cost of model building has dropped significantly, and I am no longer relying on someone else's kit design to test my crafting or artistic skills. I shared my idea with the mrs last night, and she loves it. Could be she's just saying that so I stop buying kits and storing them, hard to say. She was also quite tired from the previous day's trip to Mt Olympus, so she could have been delirious as well. Regardless, I am so very psyched about this. Just look at all the models you could build from one sheet of pink foam, or from a poster sized sheet of foam board. Just think of what you can design and build if you allow your imagination to run free. Hell, look at the likes of Close Encounters, Star Wars, and Star Trek... not to mention every other sci fi movie to emerge between the 50s and the 80s. All those ships were scratch built! We can detail them the way we want, light them the way we want, do so many things without compromise! Now then, this Gundam shown above, that's going to be some time in coming, I'm thinking start with something small at first, something simple and then work my way up. The USS Enterprise from Star Trek comes to mind, but who knows. I've got a universe full of possibilities. Only one question remains: any of you want to join me on this? Let this thread then be our gateway, where we share our projects, where we post our thoughts or techniques. | |
| | | | soothsayer
Journeyman
Posts : 1516
Join date : 2011-06-30
Age : 51
Location : Right here.
| | Subject: Re: Model Crafting Fri Aug 12, 2016 10:09 am | |
| While thinking about this in greater detail last night, I thought of a few tools I need for scratch building. Maybe "need" isn't the right word... I just don't know of what word to use when saying "in an effort to make things easier". Need will have to suffice for now.
1. A hot knife or foam cutter. Same thing, just different name. Think of a wood burner with a knife blade, and adjustable temperature settings. I've tried cutting foam with a utility knife before; depending on the blade sharpness, sometimes it works, sometimes it doesn't; with this, I should be able to cut out more intricate shapes.
2. I forget what it's called, but it looks like an electric carving knife, but for foam. This isn't a needed item as it is more along the lines of "when I get to that point". This knife is for large scale stuff made out of cushion foam. Since I am not working on that scale yet, this is for way down the road.
3. Contour gauge. Remember those panels full of pins that we'd smash our faces in, and they would keep the shape? This is the same thing, except it is in a straight line. Used for ensuring the contour of a car body (when doing body work), for matching the molding on floor boards (or crowns), and so on. This isn't a needed tool either, but I was thinking, should I be using pictures as a reference, I can "shape" the contour to match the picture; that way, when I file and sand something, I can use that gauge to see if everything matches.
4. A vacuum former. Again, one of those things that isn't needed, just makes things simpler. Maybe. This is something I have to think about. I mean, you have to carve and create the piece, and then buy the plastic used for the forming, and and and. Is it worth it? Maybe if I was doing a large scale production of something, or needed a bunch of similar parts, but for right now, or the immediate future? Not in the slightest.
Most of the tools I envision needing I already have, from the dremel to wood working and my modeling equipment. I am going to be picking up a contour gauge and (maybe) a foam cutter. Still deciding if I want to build models out of foam board and repurposed parts, or glue and stack pink foam and sculpt. Eventually it's going to be a bit of both. | |
| | | | soothsayer
Journeyman
Posts : 1516
Join date : 2011-06-30
Age : 51
Location : Right here.
| | Subject: Re: Model Crafting Fri Aug 12, 2016 1:30 pm | |
| Glue for Foam Insulation
Been checking things out regarding glue, as I've often read that foam and insulation is a pain to glue together. If you're doing something small scale, like a hill or crater for tabletop wargaming, carpenter glue, rubber glue, and even a low heat glue gun does the trick. but for large scale applications, you'll need something else entirely.
While most of my stuff will be small scale (even though I dream big), I've found that for large surface applications, or at least for things you want to remain together forever, there are two products above all others that do the trick. Keep that in mind: the glues mentioned above, you will be able to separate by pulling them apart, or the bond may break down on it's own. For permanent small scale, a low set hot glue gun is supposed to be best. But yeah, you'll want to keep in mind that your terrain will not remain permanent, though in truth I can't say what the life expectancy will be.
1. Gorilla Glue. Not the super glue kind, you want the kind that comes in a larger bottle, the one where it says to dampen one of the joining surfaces first. You will want to roughen the insulation surface before dampening so that the glue has something to adhere to. Apply glue, place a weight on top, and wait for a day or so. More on that in a bit.
2. Glidden Gripper. This is actually a paint primer, comes in one gallon pails. Apparently, this is just as good, if not better, than the Gorilla Glue. Why? Cleans up easily, and there's no pre-application process.
Both of those work equally well, so it really depends on the size of the project you are working on.
The reason you need to wait at least a day before doing any work with the foam is that, because air can't get to the center of the board, it'll take longer to dry. I haven't been able to find any information as to what is "too big to dry", but really, I don't foresee trying to make a solid table sized sculpture out of foam, would you? And that's where spray adhesives and other glues fail for large scale art projects: they don't dry in the middle. Glue your stuff, it holds only because the border has dried; begin to carve, your project will fall apart, and you'll see that the glue is still wet in the center.
Another reason why Gorilla Glue and Glidden Gripper is recommended is because they are hot tool friendly. Liquid Nails has a foam caulk, but it hardens too hard, your tools won't be able to cut through it effectively; other glues will leave your cutters tacky and gelled up.
Super glue is not recommended at all, as it will eat away at the foam.
A third glue choice that works just as well is Great Stuff, but as anyone who has ever worked with this knows, it is a mess, and it is damn near impossible to use the same can for a second or third time later on down the road.
I don't know if we have the Gripper in this area, but I have seen the Gorilla Glue.
Now then, painting insulation foam.
Painting
Spray paint cans will eat away at the foam, has to deal with the propellant used. I don't know about air brushing, haven't gotten that far on my research, but I did see one thing pop up time and time again: our old friend, gesso. Apply gesso to your finished project, allow it to dry, and then paint away! | |
| | | | soothsayer
Journeyman
Posts : 1516
Join date : 2011-06-30
Age : 51
Location : Right here.
| | Subject: Re: Model Crafting Wed Aug 24, 2016 1:30 pm | |
| Over these past couple weeks, I've slowly been buying tools for this endeavor; straight breakable knives (cut! cut! cut!), a rasp, hot wire knife, glues, stuff like that, in addition to the items bought previously (calipers, contour gauge, foam knife, etc). The only item I ordered online was a hot wire knife with replacement wires; could have gotten one from Hobby Lobby, but the reviews on that particular brand weren't all that impressive.
As far as glues go, I've a bottle of Gorilla Glue (the kind where you most dampen one side), Tacky Glue, and a dual temperature glue gun. From all the videos I've been watching, each of these will prove useful, depending on the size and scope project. Also, depending on the scope of things, I will be pinning with toothpicks or skewers; one video had a lady using a PVC frame, but she was making a full sized hellhound out of the pink insulation foam. Note that you do not want to use a hot tool to cut through foam that is glued, as the glue will adhere to the wire, making is significantly less effective. By pinning, you can shape the pieces, lift, and then pour glue into the exposed space. If you shape and pin, as long as you leave a bead of glue around the perimeter, you're good, just make sure to use a damp washcloth to remove any excess that dribbles out as this'll interfere with any sanding you may do.
Note that I'm still learning, and some glues will work better than others as far as hot tools go. It's still a matter of research and trial-n-error.
Sealant. I am revising my earlier statement as far as painting goes. Because of the nature of foam, there is a good chance that it'll break, especially if you are using the white foam made out of balls, or the floral green foam. From what I have seen, you will want to seal your project, as this will give it a nice harder shell, protecting it from some damage or normal wear-n-tear. This will also make it safe for painting. Again, from what I have seen, people are using gesso (layered coats) or watered down white glue (layered coats). There's other options, but these are the cheapest ones. The denser pink foam doesn't need to be sealed for protection, but you will want to use a layer of acrylic water based paint as your initial base.
Styrofoam options. Unless you are buying a pre-shaped piece, such as a ball or cone or ring, do not buy from Walmart! For a 1" by 18" by 12" sheet of white beaded styrofoam, Walmart charges about $9.50 (currently holding a rollback sale, making it $4.50). BUT, if you head over to Menards, you can get a 2" by 4' by 8' sheet of the same type of foam for $10.00... for the same non-sale price, you are getting 42 times the styrofoam! I didn't buy any of this styrofoam yet, but I do plan on it; I saw a video where a guy was using a heat gun on some, and oh my gawd, it looks like wind blown snow terrain. If you hold the heat gun further away, the styrofoam will be smoother. I did, however, buy some pink insulation: one sheet of 2", 1" and 1/2". You can also get it in 1.5" and .75", but I can't think of a reason why you'd want to. I did not check to see the different sizes of white styrofoam, though I do believe I saw half inch and one inch in addition to the two inch.
What else have I learned? Umm... use a knife like a saw instead of trying to slice it through, as the styrofoam will bunch and become jagged. Use the hot tools in a well ventilated area, as the foam fumes can be toxic. Wear a dust mask if you are doing a lot of sanding. Blah blah blah.
I've already been drawing up some plans for terrain buildings, going to hopefully start working on one of them this week, if not next. Nothing too complicated, just an attempt to try some things. I'll post pictures of it as I'm constructing it. In the meantime, an open invitation: if you're wanting to make terrain or any scratch built models, come on over, feel free to use my stuff. | |
| | | | soothsayer
Journeyman
Posts : 1516
Join date : 2011-06-30
Age : 51
Location : Right here.
| | Subject: Re: Model Crafting Mon Aug 29, 2016 7:57 am | |
| Below you can see a series of images of the project I am working on; this isn't a serious project, just my wanting to test and try a few different things. What follows next is what I have learned thus far.  1. I used three different types of foam: pink insulation for the base, the soft light green foam commonly seen pre-shaped into balls or cones, and a crunchy plasticy green foam. The plasticy green foam (the central piece with the rectangular cutouts) is absolutely the worst. It shaped nicely enough with a heating tool, but because it's a plastic foam, it comes out more mely than what I wanted. Might be good for projects involving an aging effect, but it wasn't worth it, not for this. Also, being so porous, it was hard to glue. The light soft green foam (I believe it's called dry foam) sucks when a heat tool is used: it'ss burn the foam, making it harder to work with, and you have to clean your tool quite often to remove the foam that has adhered to it. However, this type of foam is great for sanding! If you are doing something that involves a lot of complex shapes or contours, this is the foam to use; just sand it with a 100 grit sandpaper, and you'll be good to go. And the pink insulation, well, nothing to say about that that hasn't already been said in many a video. 2. Gluing. I used the tacky brand glue for this, and while the soft green foam worked well with it, the crunchy plastic foam did not. I haven't tried any other glue yet, but I am going to use a low temp hot glue this evening. Would have done so yesterday, but I bought a standard sized glue gun and narrow / skinny glue sticks. 3. Tools used. Industrial hot knife - I used this to cut the soft green foam half globe in half, as well as cutting out the sides; I may have had the setting on too high, but it was difficult to cut through the foam. It worked decently enough, but as described above, the green foam is not really hot tool friendly. Hot wire knife - used on the pink insulation and the crunchy green foam; worked excellently! But when used on the soft green foam, nope. Variable temp setting etching tool (can be used from wood burning to soldering to foam) - worked well enough, but haven't really played with it as much as I would have liked. As the green foam isn't the "right" kind of foam for hot work, and as it is merely a test project, I didn't want to work too much on things. I have not sealed this yet, hoping to do so this evening; going to simply coat it with gesso. The white you see in the images is from spackle, applied to hide and blend the pieces together. I don't know if spackle will work or not, as this is a dollar store brand and I don't know how well it'll stick to foam. I'm guessing it should work well enough, seeing as how the foam is porous, but we'll see. I should probably mention that the pink insulation is 14" by 14", to give a reference of size. | |
| | | | soothsayer
Journeyman
Posts : 1516
Join date : 2011-06-30
Age : 51
Location : Right here.
| | Subject: Re: Model Crafting Mon Aug 29, 2016 5:32 pm | |
| Got home, checked my project. The spackle dried nicely, as did the Tacky. Both took longer to dry than I had thought, but it worked, so who am I to complain. I'll sand the spackle and apply a coat of gesso later this evening, as Gail and I are hitting the grocery store. I realize, with the porous nature of this foam, a couple coats will be needed... that's okay. Alrighty, until next time. | |
| | | | soothsayer
Journeyman
Posts : 1516
Join date : 2011-06-30
Age : 51
Location : Right here.
| | Subject: Re: Model Crafting Tue Aug 30, 2016 7:58 am | |
| Experimental project, sealing stage. NOTE: You don't have to seal foam projects, you can just go ahead and apply acrylic or latex paint. A sealant is used just to give the foam some extra protection. Instead of using gesso, I applied a couple thick coats of Mod Podge, a glue / water / and something else mixture used for many applications. I looked things up last night, and a lot of cosplayers will use this to seal their foam armor or other foam projects; I didn't know this when I first bought it, so yay for me. I would have used gesso, but that was upstairs, and I was too lazy to climb back up the basement steps... the mod podge was in reach, so, why not. According to the directions, you can sand between coats, and each coat should have a drying time of 20 minutes. My layering was still tacky to the touch after an hour, so I didn't sand it at all. As you can see by the picture below, it did a nice job of coating the light green foam (the curved sides). It doesn't seem to really coat smooth or shiny surfaces evenly, but that's fine; as long as there's some sort of protection on it, I'm fine with it. I probably could have done without coating the pink foam and the blue bottle anyway, but I wanted to see what would happen. I did note one thing though: I should have painted in stages. If you look at the main body, where the hoses are coming out, there's a bit of green exposed; there's matching green visible on the wings and the other side. I can probably go back and cover them up using a fat artist's rush, as I used a narrow house brush for this coating. Anyway, I'll just have to keep that in mind for next time, to assemble / coat / paint in stages. 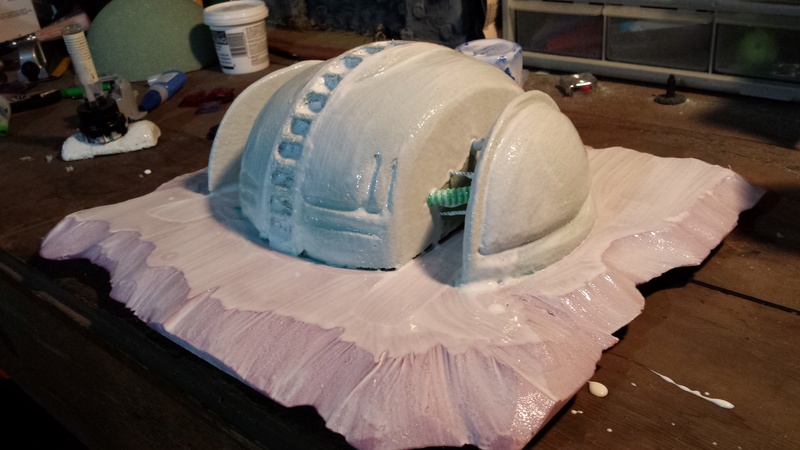 The section where I spackled may look as if it's higher than the curved area, but it's not. It's just whiter because, duh, of the spackle underneath. It sanded out just fine. I didn't look at the project this morning before heading out to work, but I'l take a gander this afternoon and see if it needs to be sanded (with a fresh coating to boot), or if it's good to go. | |
| | | | soothsayer
Journeyman
Posts : 1516
Join date : 2011-06-30
Age : 51
Location : Right here.
| | Subject: Re: Model Crafting Wed Aug 31, 2016 8:11 am | |
| Alright, so when I got home last night, I checked the project; it had mixed results, though probably due to personal expectations than anything else. The mod podge seemed to have been absorbed by the floral foam, which still had it's original gritty texture, while the podge on the crunchy foam pooled within the recesses. The pink foam had a tacky feel to it, but was otherwise dry.
I applied three thin layers of mod podge onto the foam over a course of 4.5 hours. The bottle says every 15-20 minutes, but that doesn't seem like enough time, though I can see doing that if you were wanting a rather sticky surface for easier application of flock or maybe sand (will have to try that). Being a watered down glue, I would think this would work well for flocking, but we'll see... right now, I just want to put a protective layer on the foam.
I checked the results this morning before heading out to work: things are turning out really well. The soft green foam no longer feels tacky, and I can press the foam with the soft part of my thumb without it sinking in. There's a couple areas where the glue pooled so it wasn't completely dry, but I expect it to be so upon my return. There was one band or area that didn't have the protective feel, and that was... if you look at the picture above, the one with all the glue... see the etched part that looks like an F on it's side? See where the front of the project kind of blends into the side? There, that entire edge / blended corner. I'm thinking maybe because it has such a narrow surface area, that the glue pulled away to the sides as it dried / contracted. I'll give it another feel later today, maybe put a coat just along those edges. Maybe.
Other than that, I think we're good to paint. I've plenty of that Walmart brand acrylic paint, what's it called, Fine Art? With the layers of Mod Podge I have on, I don't have to worry about this type of foam absorbing the paint. *fingers crossed*
Of course, all of this would be rather moot if I used "normal" foam, like the pink stuff or styrofoam, but noooo, I had to experiment. Then again, I did learn that the light green stuff is great of sanding / sculpting, so... | |
| | | | soothsayer
Journeyman
Posts : 1516
Join date : 2011-06-30
Age : 51
Location : Right here.
| | Subject: Re: Model Crafting Thu Sep 01, 2016 8:03 am | |
| Posting another picture, but at this point the need really isn't there. I just started this series of pictures to illustrate if using this type of foam was workable and to give my opinion on it; that's been accomplished a while ago. I still don't think that hard plasticy foam is a viable choice, but the softer green floral foam is: it can be easily sanded to produce a variety of curve or contours, it can be sealed effectively (just several thin coats), it can be glued (just takes a bit of time to cure and set). I would recommend this type of foam for statues or faces, things that need a lot of sculpting. But again, that plasticy foam? Utter crap. If you can think of a use for it, by all means let me know. I suppose it could be used to represent coral, or sliced to show weathering on an otherwise smooth surface... 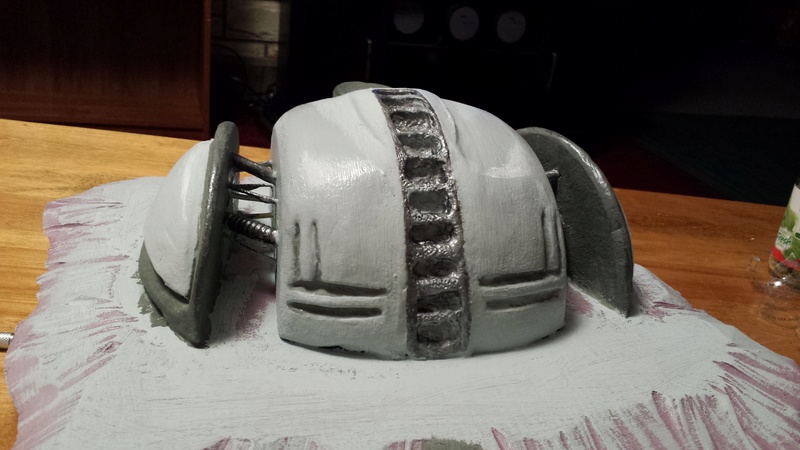 As you can see from the photograph, the paint took really well to the foam. The sealant worked wonders, as there was no paint absorption. On the gray sections I used granite, dolphin gray, and white; the darker trim was pewter, flat black, and gunmetal (the reflections seen on top of the wings); on the central rail, gunmetal and sterling silver. I know I could have done a better job painting things, but that wasn't the point behind this. Anyway, the paint used was that stuff bought at Walmart, paints I've had lying around for a while now, and they worked great! I only needed to do one layer, and even when I had to go back and do touch ups, only one coat was needed to cover a darker shade. This morning I bought the colors pavement, some shade of brown, and a lighter shade of brown so I can paint the sides of the base. Want to get that painted so I can apply some flock... figure it'd be better to do that in that order, so as I don't get paint on the grass. Then I hope to apply some moss here and there, maybe some spanish moss hanging from the cables or connectors. Then I'll paint and attach the gun barrel. So I suppose there will be two more pictures for this project then, just for the sake of completeness. | |
| | | | soothsayer
Journeyman
Posts : 1516
Join date : 2011-06-30
Age : 51
Location : Right here.
| | Subject: Re: Model Crafting Tue Sep 06, 2016 8:16 am | |
| Alrighty, here are the final shots of this, my test project. I've tested three different types of foam (pink, floral, crunchy plasticy), two sealants (mod podge and white glue / water mix), hot glue (low and high temp), glues (tacky and white). The paints used were the Apple whatever or Fine Art acrylic paints from Walmart, I don't remember the name (but they're fifty cents a bottle). Oh, I also tested the application of dried moss, fresh moss, reindeer moss, and a blend of spices. All of that testing resulted in this: 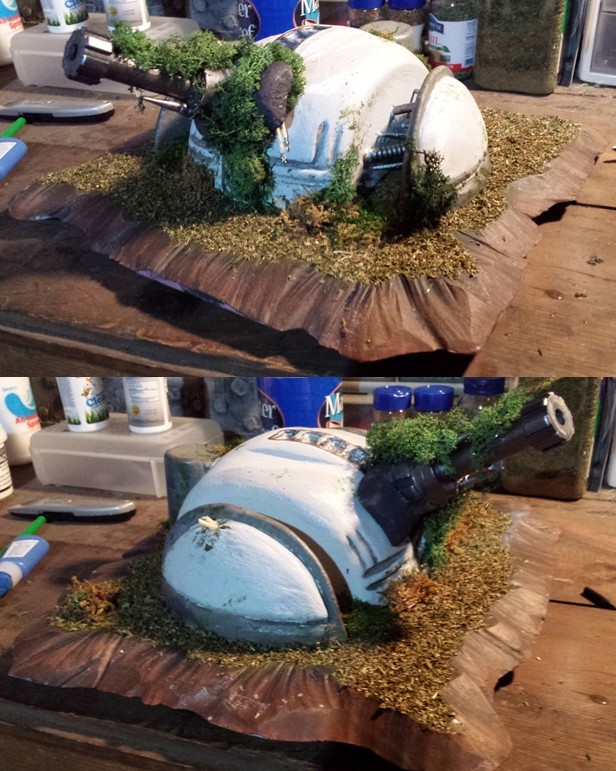 The barrel is removable. Thought it'd make more sense that way, easier to store or transport without worry of it breaking off. Two dry wall screws inserted into the crunchy plasticy foam of the base forms the contact point, with a wide round refrigerator magnet with a smaller yet stronger button magnet super glued to the first on the base of the cannon. 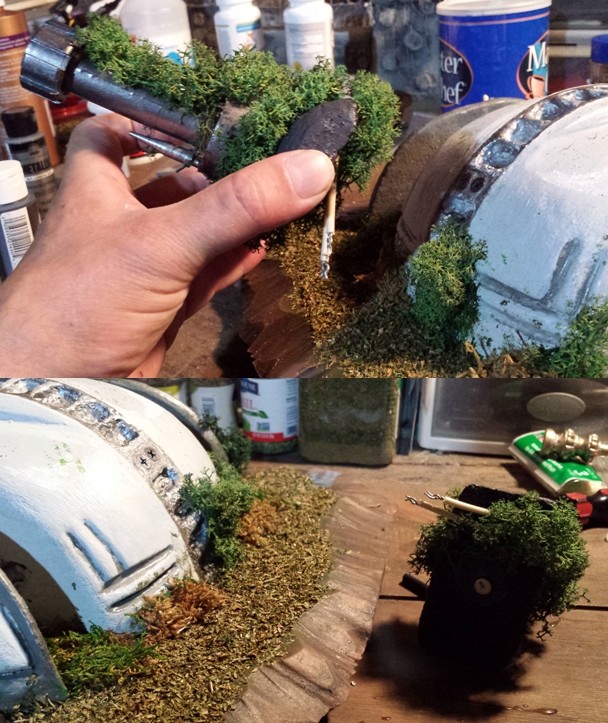 Lastly, a picture to show the scale of this. I can tell everyone that the base is roughly 14" by 13", but that doesn't really put things into perspective... so here you go. Makes for a nice central piece for a game of 40K or WarMaHordes, doesn't it? Some long lost or abandoned technology always makes for a good climatic battle. 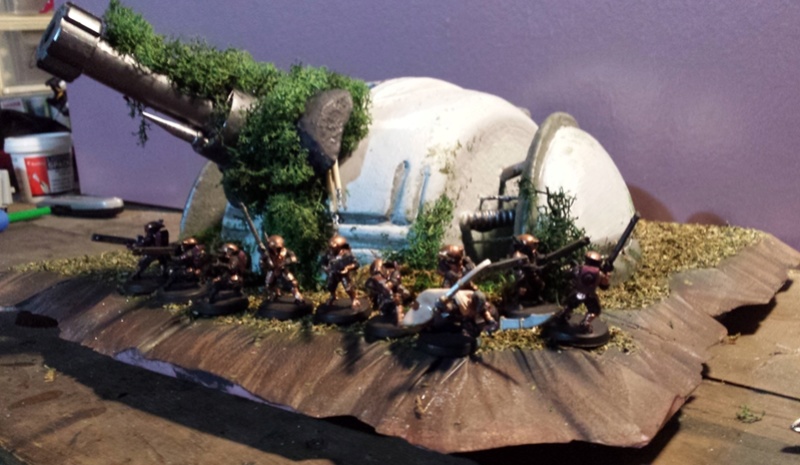 | |
| | | | soothsayer
Journeyman
Posts : 1516
Join date : 2011-06-30
Age : 51
Location : Right here.
| | Subject: Re: Model Crafting Mon Sep 19, 2016 8:33 pm | |
| Project Two: Foamboard BunkerFoamboard is excellent to work with, and would make an ideal material for cardstock papercraft type modeling. Cut your shapes and simply use white glue, stick pins to hold the pieces together, and you're good. What follows are a few pictures of what I was working on this past weekend, followed by some additional commentary. 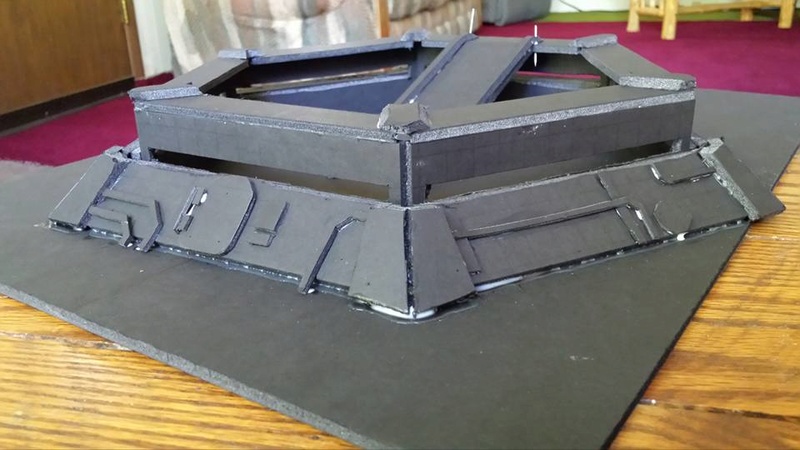 This should be picture 2 of 4, but whatever. Here I began to add greebles, bits and pieces that don't really do anything but look interesting. 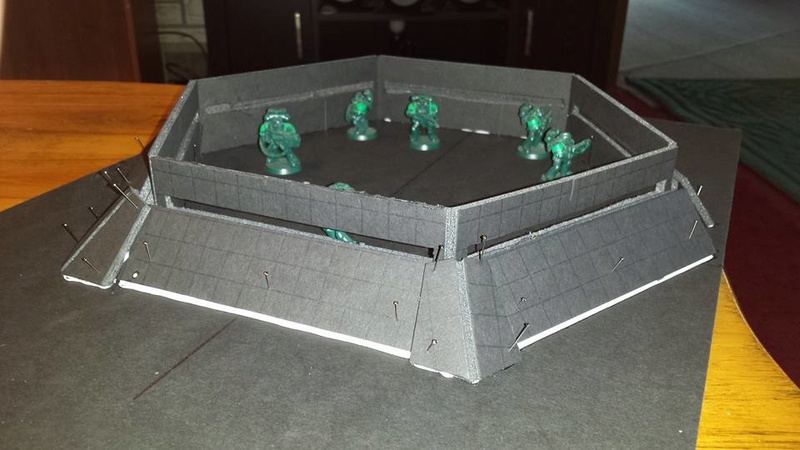 Picture 1 of 4. Got the general shape of things, allowing stuff to dry. Each vertical wall is 6 inches long and is set at 60* from one another. The angled plate in front is at 45*. 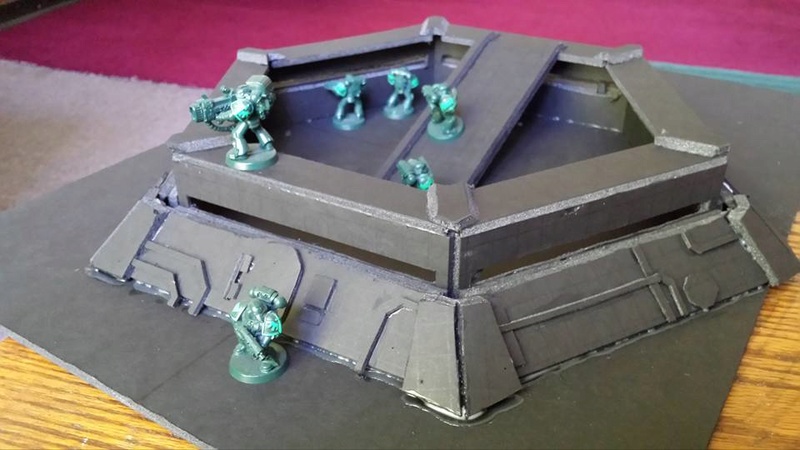 Picture 3 of 4. Have some Space Marines to show off the scale: the window slits are at head height, the ramp is wide enough for infantry to march up two by two, and the walkway is wide enough for infantry to stand on without worry. The hatch is tall enough for a marine to walk through, but it is sitting at an angle, so he'll have to duck a little when stepping through. 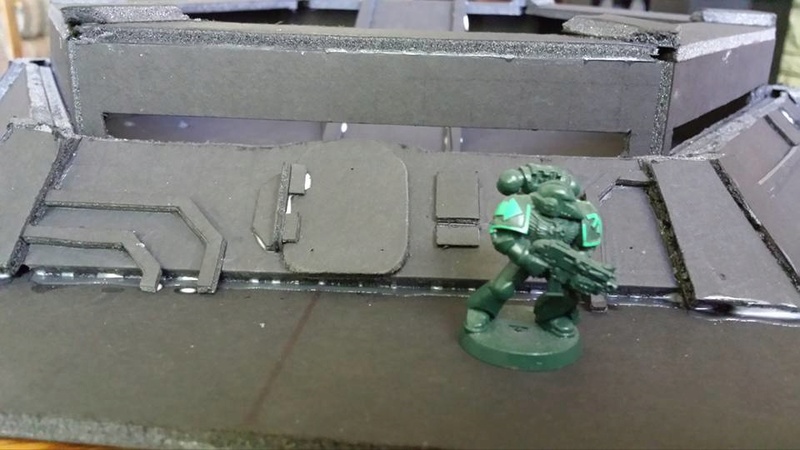 Picture 4 of 4. Just a different shot to show off the door. *** {edit} My intention is to now add some window screening to the ramp and possibly the walkway, to simulate a grippy no slip pattern. I probably should have put that on before I added the braces on the ramp and the corner fixtures on the walkway. Also, I wanted to coat the exterior of the bunker with some mod podge and then sprinkle extremely fine sand on it; when painted, I thought it'd give a nice concrete kind of look or feel, but silly me went crazy with the greebles before I thought about the sand. Live and learn. I could still do that, would just need to be careful with my brushing. This is going to sound silly, but I will need to remember that this is like building an actual structure, have to be mindful of the layers and how they go on.
Last edited by soothsayer on Tue Sep 20, 2016 8:58 am; edited 1 time in total | |
| | | | soothsayer
Journeyman
Posts : 1516
Join date : 2011-06-30
Age : 51
Location : Right here.
| | Subject: Re: Model Crafting Tue Sep 20, 2016 8:48 am | |
| Regarding foam board
The foam board was pleasant to work with, and as I described in the previous post, is much like working with cardstock for the creation of papercraft products. Regarding this bunker project, I will be using caulk to fill in some of the gaps as seen on the corner edges and to smooth out the visible foam edges.
A couple things of note:
1. You will need to use a sharp xacto knife or similar; I used a blade from a no name generic set, and while it did cut well, it didn't retain it's edge for long. It could have been the blade, or it could have been just the nature of the board. I don't know. I'll try an Xacto blade next time, but regardless, once you start having difficulties, swap out the blades.
2. The paper backing can peel off. If you don't want it on, it's easy enough to take off. I'm leaving it on simply because it was easy to glue stuff onto it. Also with the paper backing, note that the white is gloss while the black is flat. Makes a big difference when it comes time to paint.
3. Stick pins are your friends! Pushing the pin in at an angle helps hold the pieces together while they dry.
4. In cutting, make a couple different cuts. The first slices through the paper backing, the second goes through the foam. You can easily cut through the foam without cutting the bottom layer of paper, allowing different pieces to retain their connection. As an example, the vertical walls of the bunker: I got three sides out of one strip, and they are all held together by a layer of paper.
5. While the foam board comes in one thickness, it is possible to get some sense of depth with it. The foam can be squeezed by your fingers, essentially cutting the thickness in half. You can also take your xacto knife handle and use it like a rolling pin, adding more pressure to the flattening of it, thus making an even thinner piece. If you look at the last picture above, you'll see that the pipework on the left side was finger squeezed... see how the thickness is thinner than the corner armor? And then there's the monitor / keypad to the right of the hatch; those were rolled flat. You can't tell from the pictures, but on the ramp, the portion going onto the walkway, I left a portion of just the paper so that the foam could blend together.
Foam board is going to be great if you are cutting from a template, or are working with small scale items. I can't see the thinnest pink foam (3/4") being used for this bunker. | |
| | | | soothsayer
Journeyman
Posts : 1516
Join date : 2011-06-30
Age : 51
Location : Right here.
| | Subject: Re: Model Crafting Thu Sep 22, 2016 11:08 am | |
| Planned project: dice towerI'm thinking for my next tabletop gaming project that I am going to make a dice tower. Right now I am trying to decide on a couple issues, maybe others would like to add some suggestions. 1. Ramps, pins, or both. The way a tower works is that it has a series of ramps or pins that the dice will fall onto and tumble about. I'm looking at these designs, and I have to admit, I don't see how a die is going to tumble on a ramp. It may flip on a side, but the I just imagine it sliding down; when it hits the next ramp, it flips back and slides. I'm thinking that what I need to do is, well, let me make an illustration. 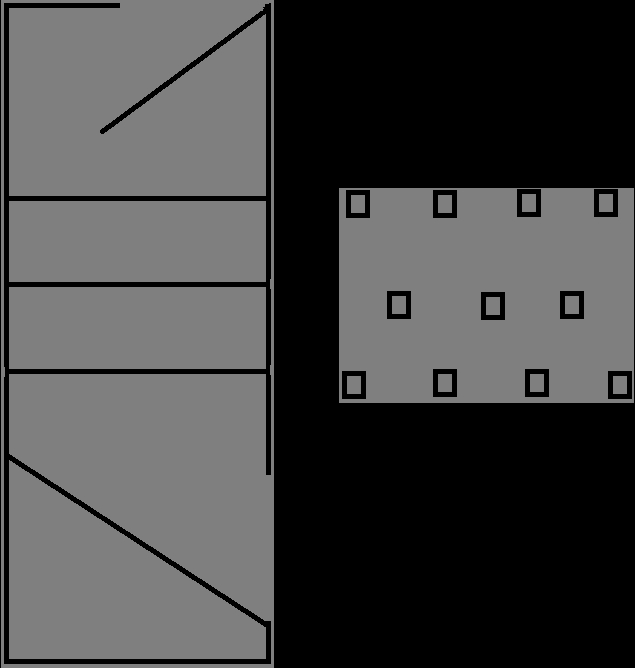 Dice go down the initial ramp, bounce about on the rods, land and slide out the bottom ramp. I've seen simple two or tree ramp towers, but I think that this will give a better chance of randomness. Of course, all of this depends on just how big I want to make this tower; the taller it is, the more tumblers that can be inserted. How tall would you go about making this? Does my methodology sound good, or would you try something else? I would love to have the rods running perpendicular to each other. each layer going it's own way. Ooh, maybe a nice hexagonal tower, to opposite sides would be the two ramps. and then the other side would have the crossing rods. I should have the game Kerplunk at home, unless that was one of the things to go. That would certainly make a nice test bed for this. 2. I forget what the second thing was. | |
| | | | Sponsored content
| | Subject: Re: Model Crafting | |
| |
| | | | | | Model Crafting | |
|
Similar topics | |
|
| | Permissions in this forum: | You cannot reply to topics in this forum
| |
| |
| |
|